QuickWeb Invoicing
QuickWeb Invoicing is a set of Westpac hosted payment pages that allow your customers to pay for invoices online.
This page describes QuickWeb Invoicing. Other types of QuickWeb are:
- QuickWeb Standard - Customisable hosted payment pages for payments by card and bank account.
What is QuickWeb?
QuickWeb is a set of Westpac hosted payment pages. Your website directs your customer to pay using QuickWeb by card or bank account.
See QuickWeb Technical Implementation Guide for more.
What is invoicing?
Invoicing in QuickStream is the ability for you to upload invoices for your customers to pay.
Invoicing allows your customers to:
- Pay one or more invoices using card or bank account,
- Underpay invoices,
- Underpay invoices, but also leave a dispute or other comment.
Invoicing allows you to:
- Receive payment information allocated to one or more customers and invoices.
- Handle invoice payments both inside and outside of QuickStream.
QuickStream has two interfaces to standard invoice payment functions:
- IVR interface - QuickVoice Invoicing.
- Customer facing web interface - QuickWeb Invoicing.
What is QuickWeb Invoicing?
QuickWeb Invoicing displays your customer's invoices and bills online for payment. The extra benefits are that your customers can:
- View invoice details,
- View invoice line item details,
- View invoices in PDF and HTML formats,
- Pay other payable items such as debit notes, open items, or general outstanding balances.
- Customise the look and feel of both the QuickWeb website and downloadable invoices.
Implementing QuickWeb Invoicing
To implement QuickWeb Invoicing:
- Define the customisation options and provide those to your Westpac contact.
- Build the ability to produce an Invoice upload request file from your systems.
- Build the ability to consume the Cash Applied File in your systems.
- Define a group email address to send notifications about file processing.
- Build the ability to hand your customer over to QuickWeb Invoicing.
- Optionally build the ability to receive your customer back from QuickWeb Invoicing.
- Optionally build the ability to consume a server to server response from QuickWeb Invoicing.
- Perform testing in our Test environment.
- Provide sign-off on your testing.
- Transition into your Production environment.
- Perform live testing in our Production environment.
- Roll out QuickWeb Invoicing into your business processes.
During testing, refer to:
After you have completed testing you must send a sign off email to your Westpac contacts. The email will state that you have successfully tested all aspects of the solution and you are ready for it to be moved into production. See a sample sign-off email.
During production lodgement:
Once production lodgement is complete and you are satisfied with the results of your low value tests in production you are ready to go live. The term "go live" represents the date you will make the solution available to your customers.
At this stage of the implementation process there are only a few tasks left to complete. They are:
- Before the go live date, communicate with your customers to inform them about the new payment process.
- On the go live date, update the appropriate page (or pages) on your website to make the new solution available to your customers.
After you go live, Qvalent and Westpac will closely monitor the solution. This is known as the "monitoring phase" and lasts for two weeks. During this time, if you have any questions or concerns about the solution you should communicate directly with your Qvalent implementation manager.
Once the two week monitoring phase is over the implementation process is officially complete. This is the post implementation period. Your Qvalent implementation manager will hand the solution over to the Qvalent helpdesk. The helpdesk will be responsible for day to day monitoring of the solution and resolving any issues that occur.
If you have any questions or concerns about the solution at this point contact the helpdesk: Technical support and system health.
See also:
Invoicing concepts
Invoices
An invoice is a payable document. It is issued to your customer as notification of an amount you are owed. An invoice has:
- a total amount payable,
- an outstanding amount,
- optional invoice line items.
In QuickWeb Invoicing
- an invoice can be underpaid, paid, viewed, and downloaded by your customer.
- an invoice is considered open while there is an outstanding balance that is greater than 0.00.
- an invoice is considered closed when the outstanding balance is 0.00.
- an invoice can be referred to as an invoice, a bill, a debit note, open item or other outstanding item.
Invoices are provided by an Invoice Upload Request File.
Invoice line items
An invoice line item describes one or more items that make up the goods/services for an invoice. For example, 10 hours of architecture work or 15 bags of coffee.
In QuickWeb Invoicing:
- Invoice line items are optional.
- Invoice line items are displayed to your customer. Invoice line items are displayed on the QuickWeb pages and in the invoice.
- Payments are not allocated to invoice line items. Your customer can underpay an invoice and provide a dispute or other comment.
Partial payments
An invoice can be underpaid. This is also known as a partial payment. Your customer can provide a dispute or other comment when paying one or more invoices. You may wish to turn off partial payments.
Overpayments
An invoice cannot be overpaid using QuickWeb Invoicing.
Payment flow
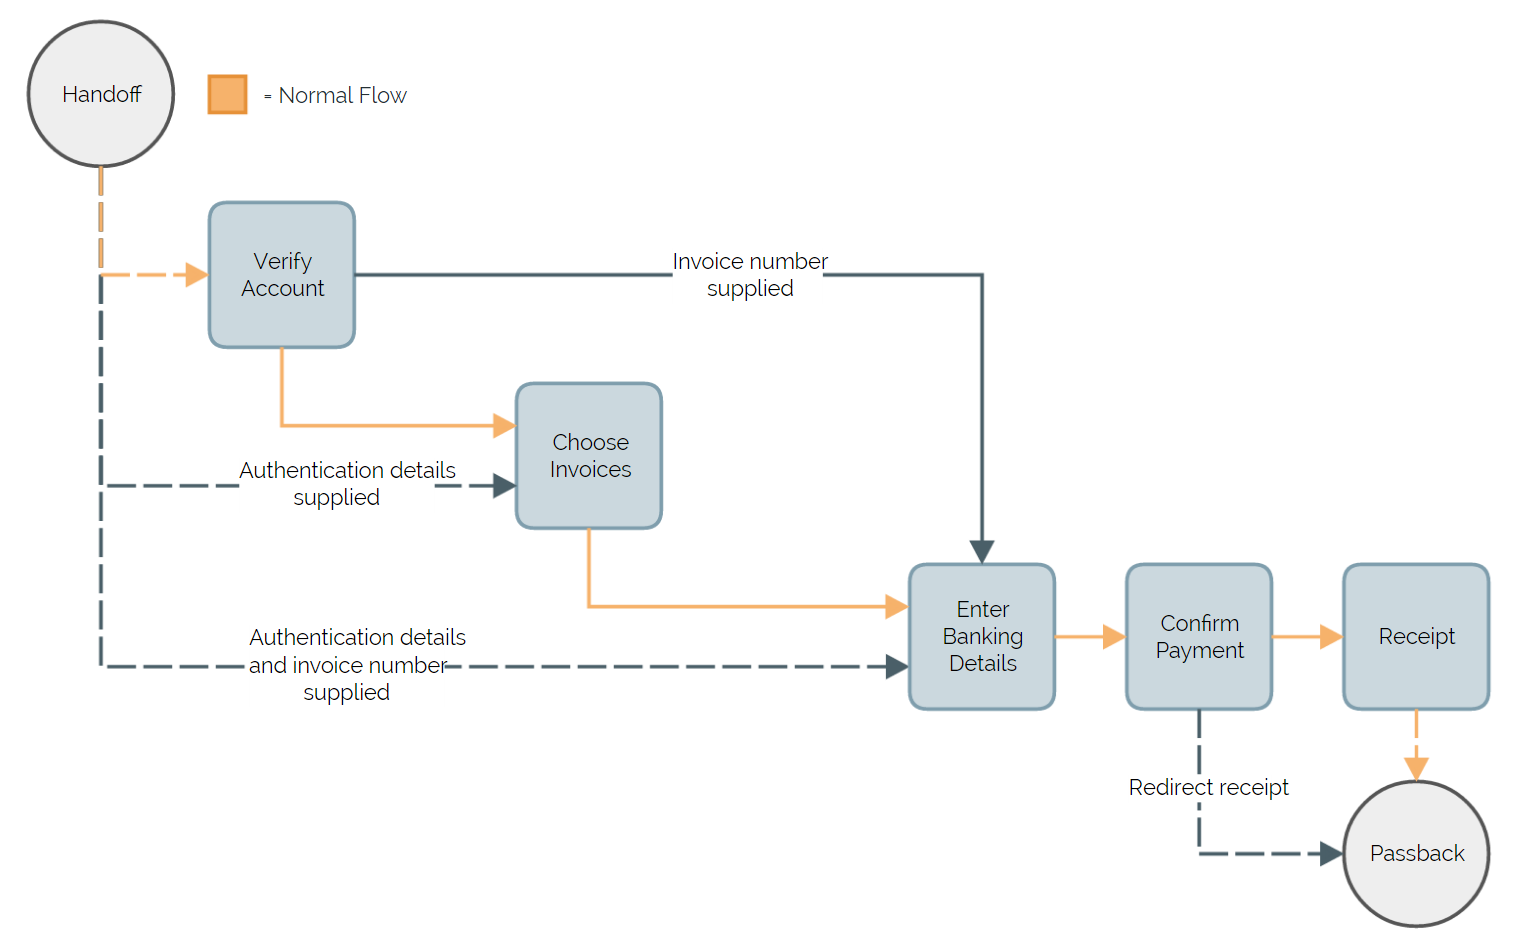
The payment flow below describes the complete set of functionality available to QuickWeb Invoicing. The flow has 7 steps.
The steps are described below and refer to the payment flow diagram.
Handoff
The payer is handed-off from your website to QuickWeb Invoicing in this step. See Handoff your customer to QuickWeb.
Related sections:
- Disable partial payments.
- Bypass the 'choose invoice' step.
- Bypass the account verification step.
- Managing your security settings.
- Parameters for the Secure token request.
- Parameters for the Form inputs handoffs.
Verify account
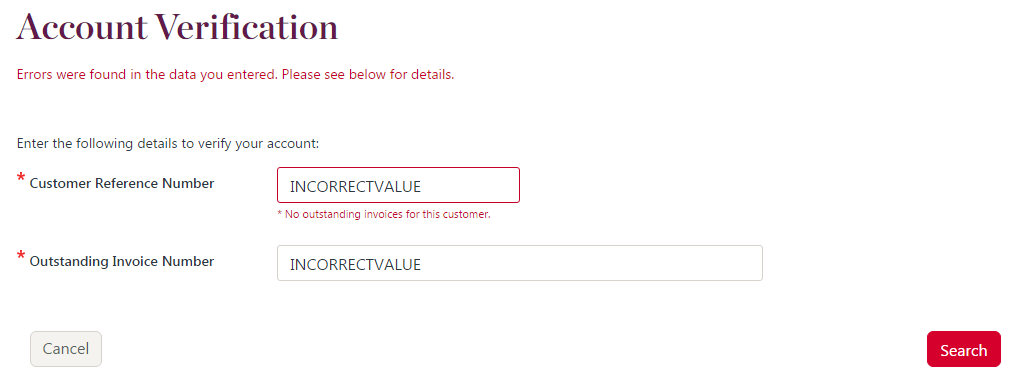
The payer must be verified before they can access invoices and make payments. There are two pieces of information that must be provided:
- Customer reference number - your unique identifier for a customer. This is provided in the Invoice upload request file.
- Outstanding invoice number - your invoice number for an outstanding (unpaid) invoice. This is provided in the Invoice upload request file.
The payer enters both pieces of information correctly and proceeds to the choose invoices step.
Related sections:
- Verify account step failures.
- Change the look and feel of the payment pages.
- Bypass the account verification step.
- Change the outstanding invoice number in the account verification step to a custom lookup.
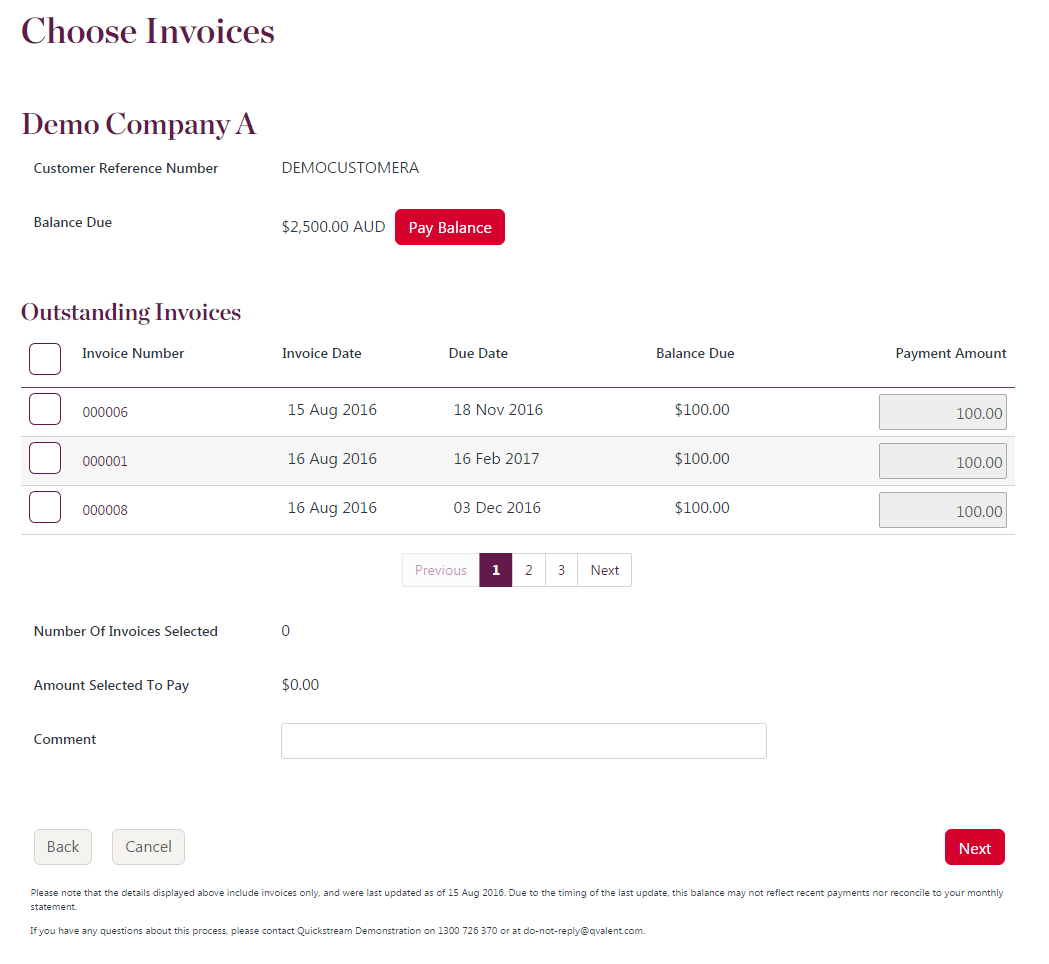
Choose invoices
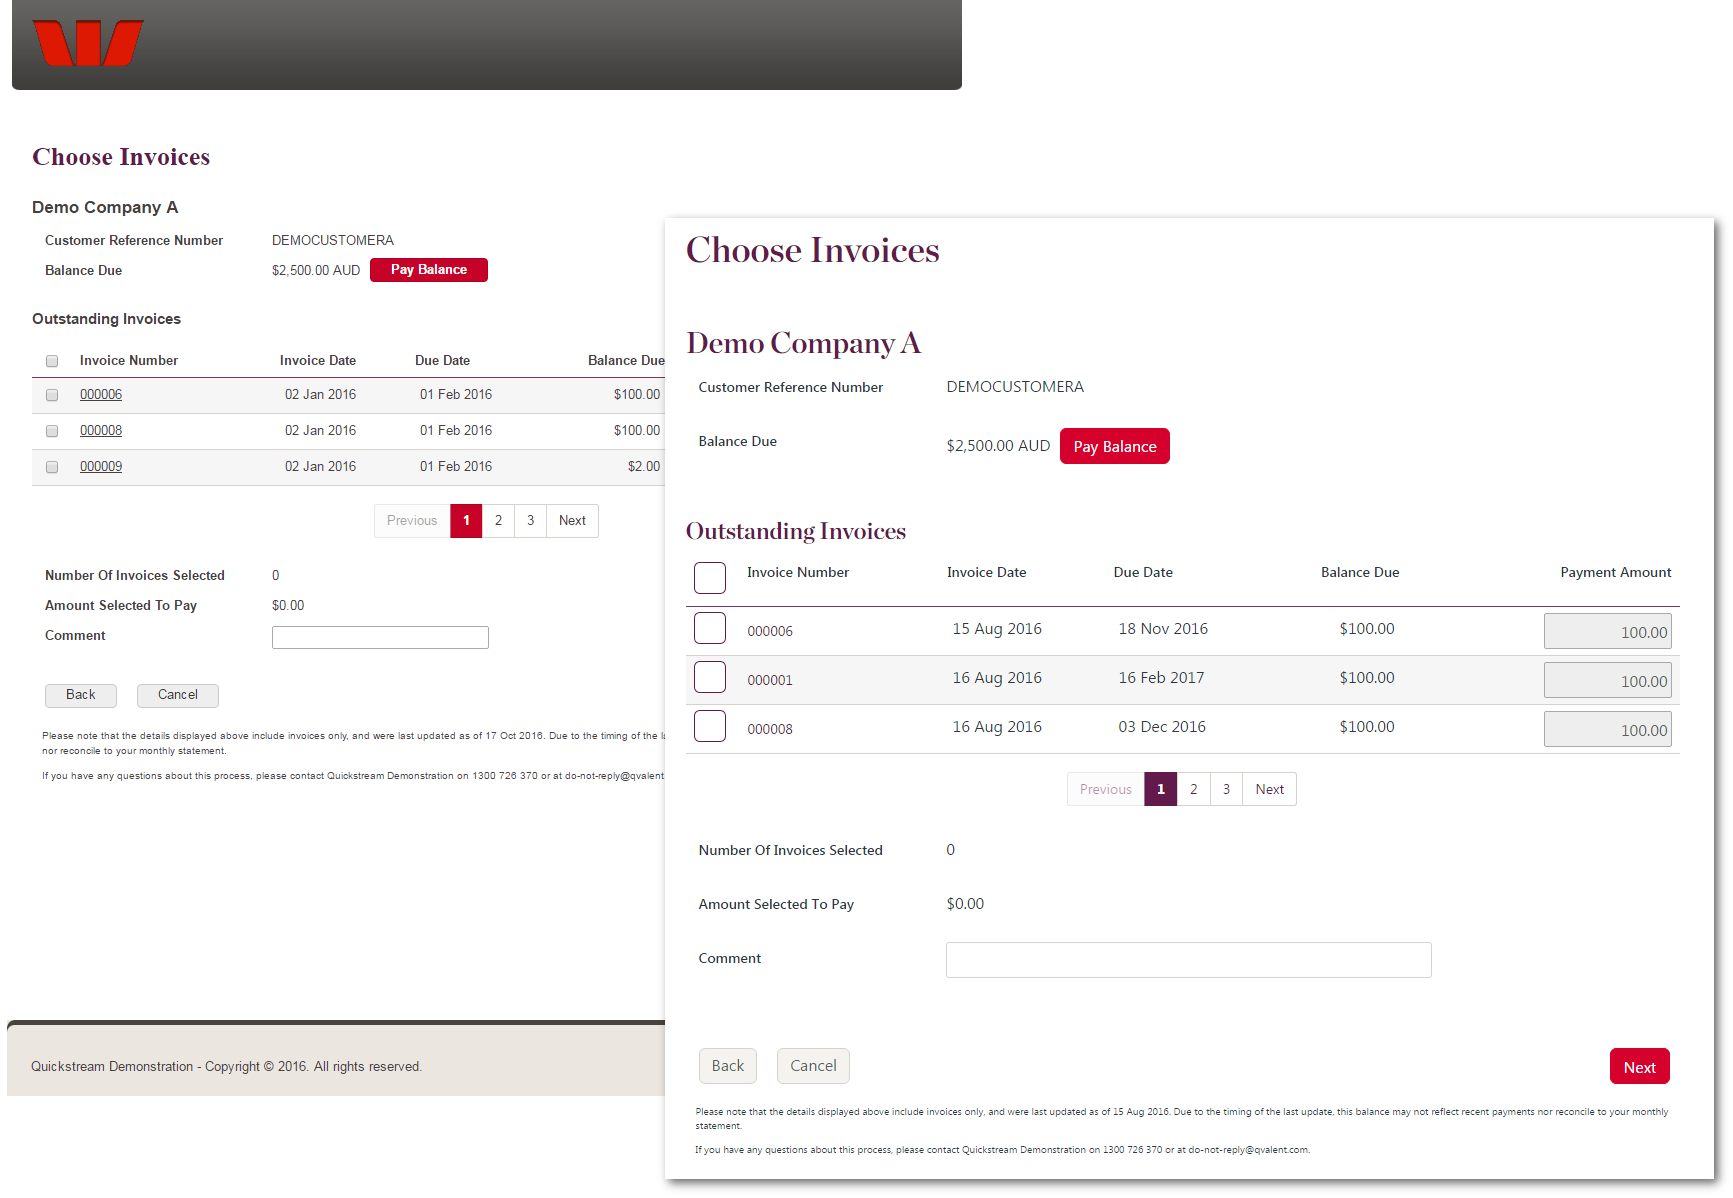
The payer may choose one or more invoices to pay. The payer can also enter a comment and enter partial invoice payment amounts.
Related sections:
- Change the look and feel of the payment pages.
- Change the look and feel of invoices.
- Change the dispute/comment box.
- Bypass the 'choose invoice' step.
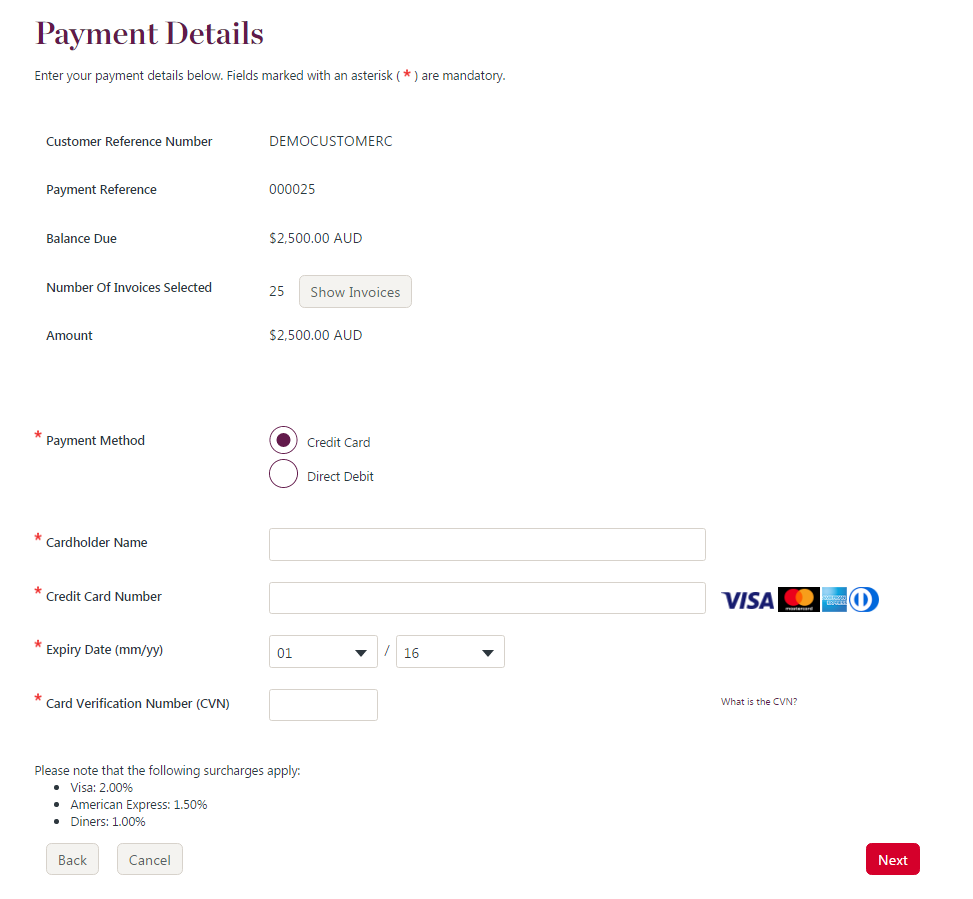
Enter banking details
The payer will enter their card or bank account details. When a surcharge is applicable, the surcharge rates are displayed.
Related sections:
- Change the look and feel of the payment pages.
- Register the payment account in QuickVault.
- Restrict a payer to only card payments or bank account payments.
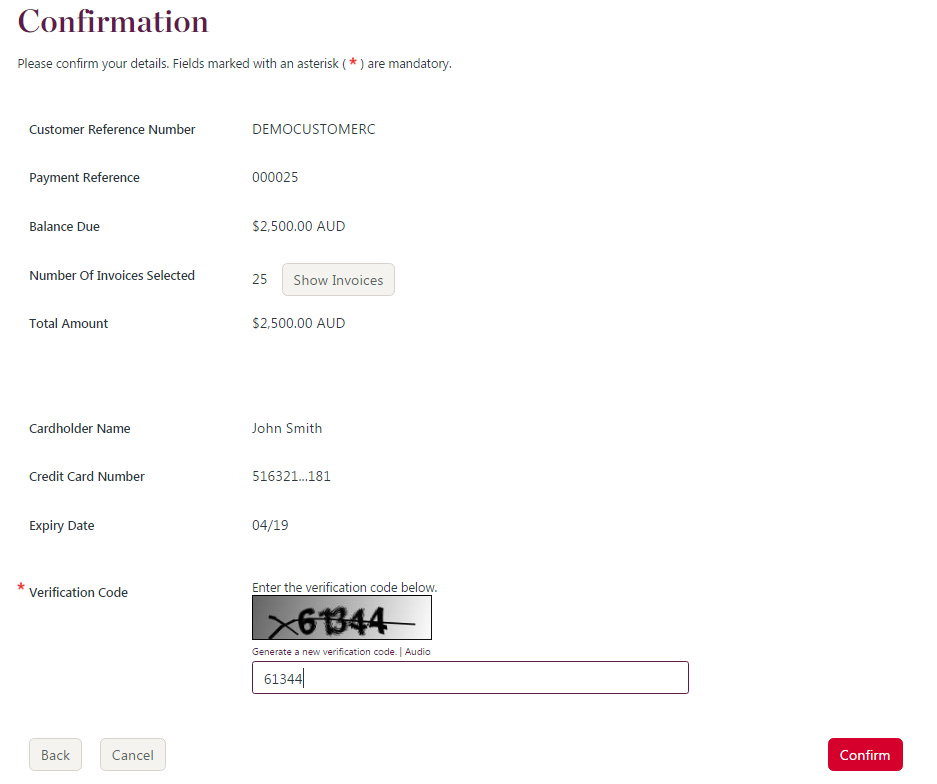
Confirm payment
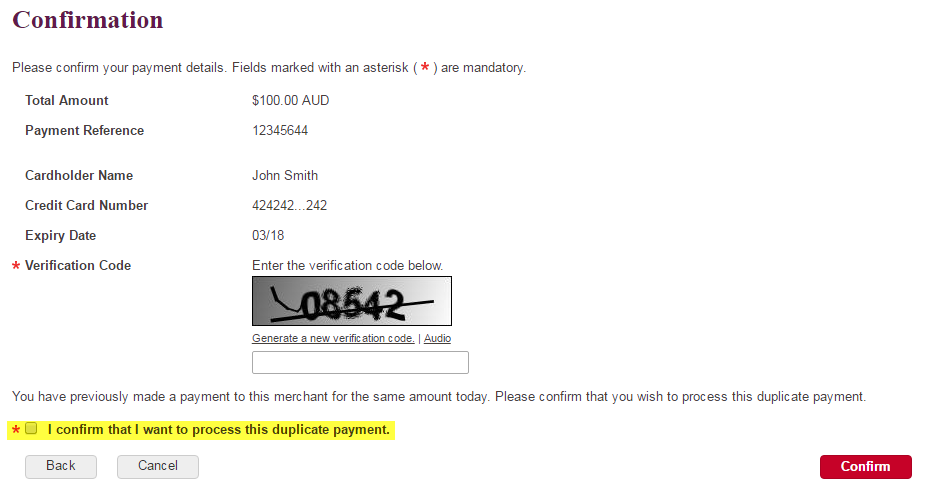
The payer will confirm their payment details. When a surcharge is applicable, the new amount is displayed and the payer must tick a checkbox to continue.
If the payment is identified as a duplicate, the payer must tick a checkbox to continue.
The payer must complete a CAPTCHA challenge before the payment is made.
Related sections:
Receipt
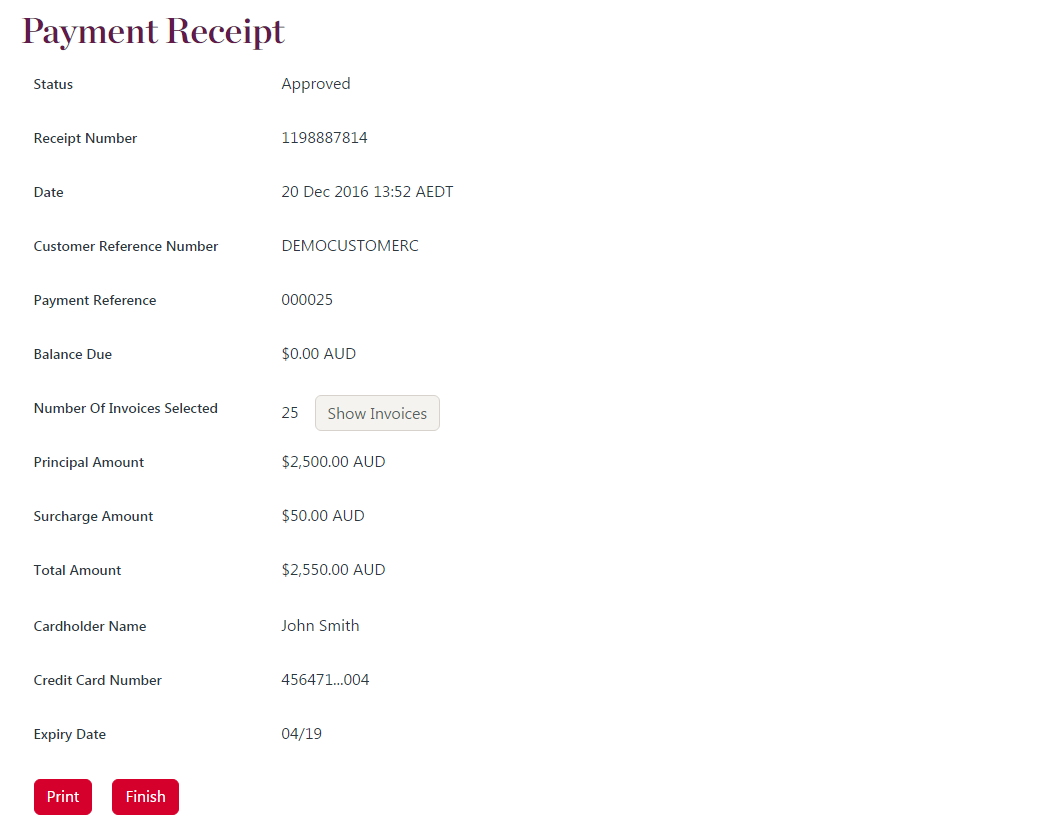
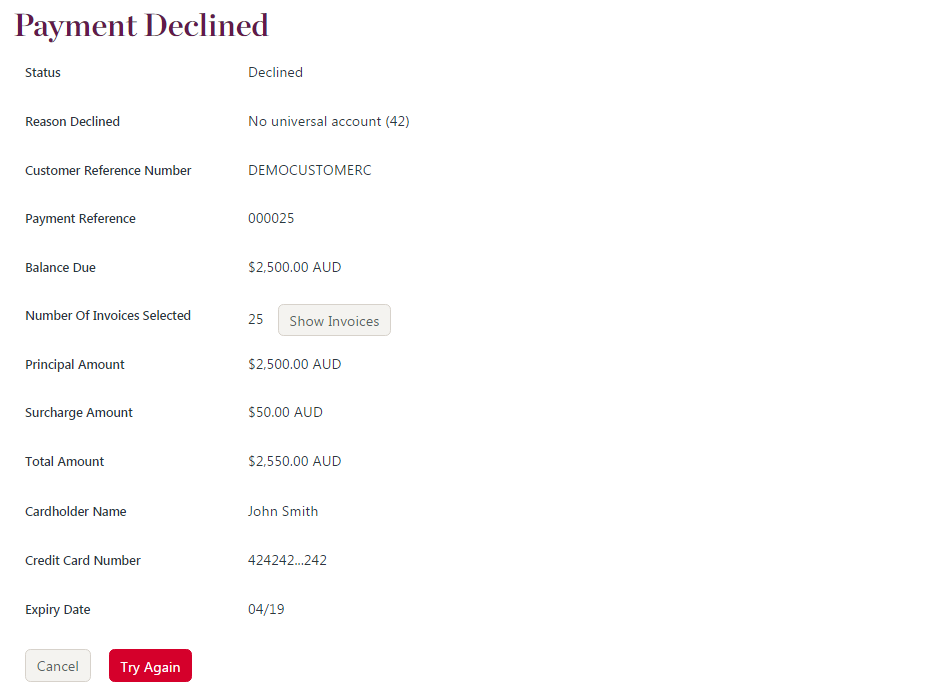
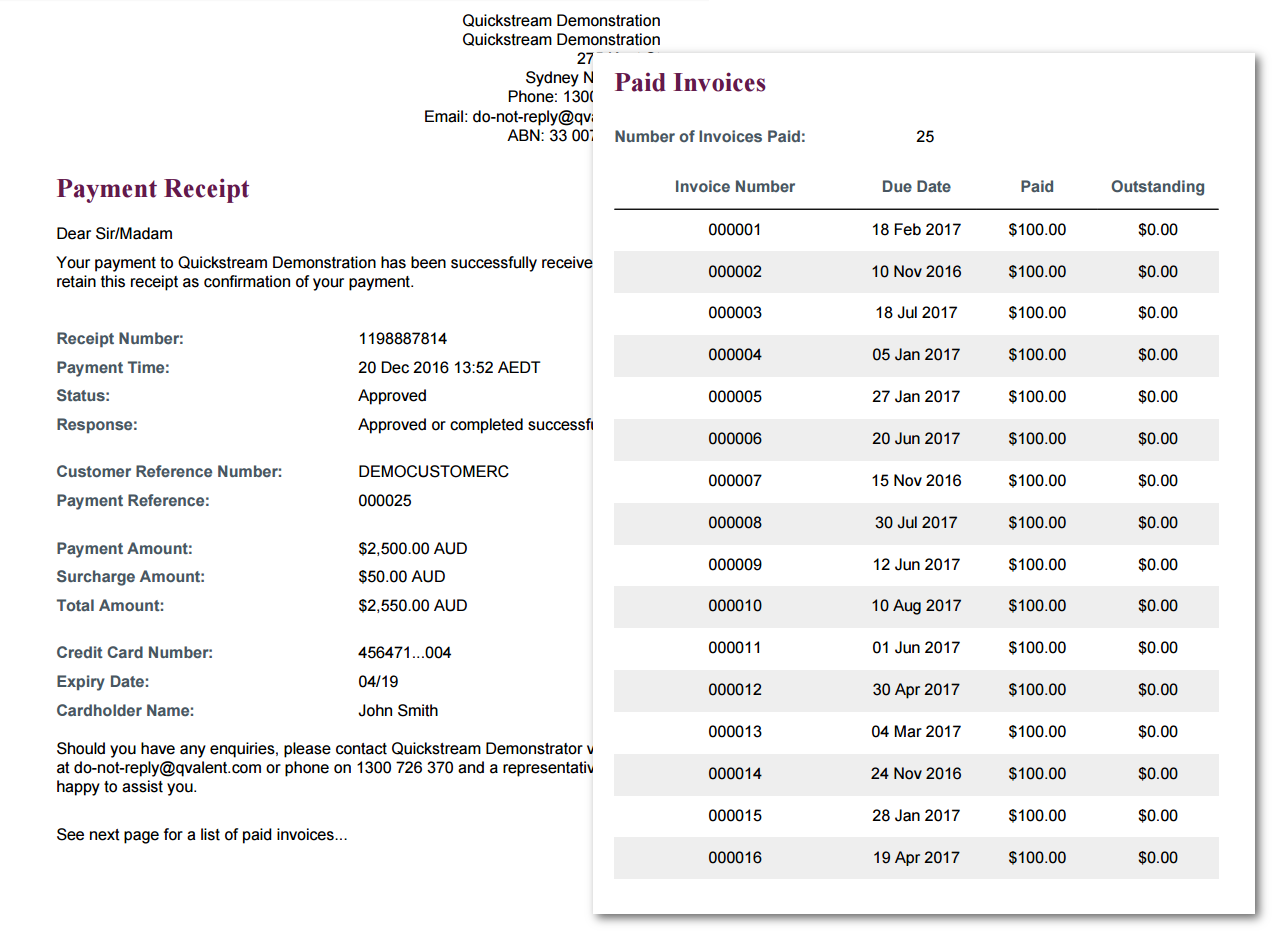
The payer will view the details of the successful or declined payment. The payer can enter an email address to send a receipt via email, or download the receipt as a PDF.
Related sections:
- Change the look and feel of the payment pages
- Change the look and feel of the payment receipt
- QuickWeb receipt page links to your website
Passback
Your customer is passed back from QuickWeb Invoicing to your website in this step. See Handoff your customer back to your website.
Related sections:
Customising QuickWeb Invoicing
When a test QuickWeb Invoicing facility is provided to you, it will have the maximum amount of features the product offers. You can then choose to change or remove some features. This is done during your Westpac implementation project. Customisation options include:
- Change the look and feel of the payment pages.
- Change the look and feel of the payment receipt.
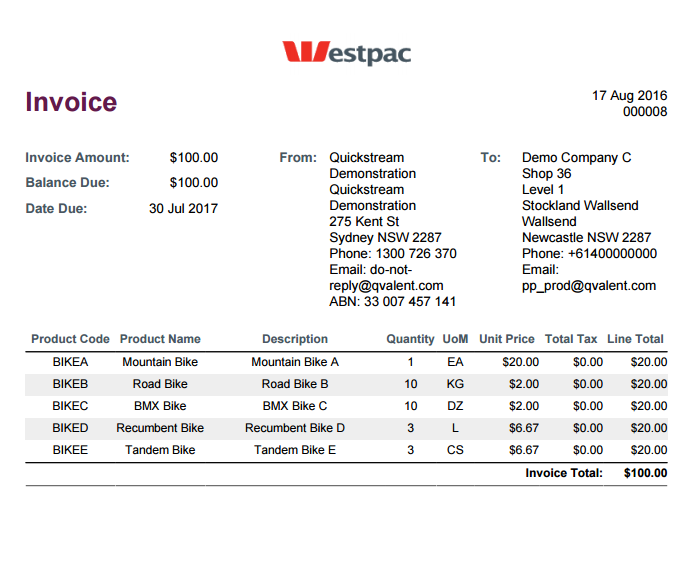
- Change the look and feel of viewable and downloadable invoices.
- Disable partial payments.
- Do not display invoice line items.
- Change the dispute/comment box to a different element (such as a list of dispute reasons).
- Bypass the 'choose invoice' step.
- Bypass the account verification step.
- Change the Outstanding invoice number in the account verification step to a custom lookup type (charges may apply).
- Register the payment account in QuickVault.
- Restrict a payer to only card payments or bank account payments.
Each of these items is explained in the sections below.
Change the look and feel of the payment pages
The QuickWeb Invoicing payment pages have a default Westpac brand. You may change this to look like your customer-facing website. To accomplish this, provide one or more of the following to your Westpac contact:
- A URL to the brand website.
- Provide style guide and brand documentation.
- Change the look and feel of the QuickWeb Click-through.
Download QuickWeb click-through
Download the QuickWeb click-through, brand the web pages and provide them back to your Westpac contact.
Change the look and feel of the payment receipt
The payment receipt has a default Westpac brand. It includes payment and invoice information. You may change this to look like existing payment receipts, and show less information.
Change the look and feel of invoices
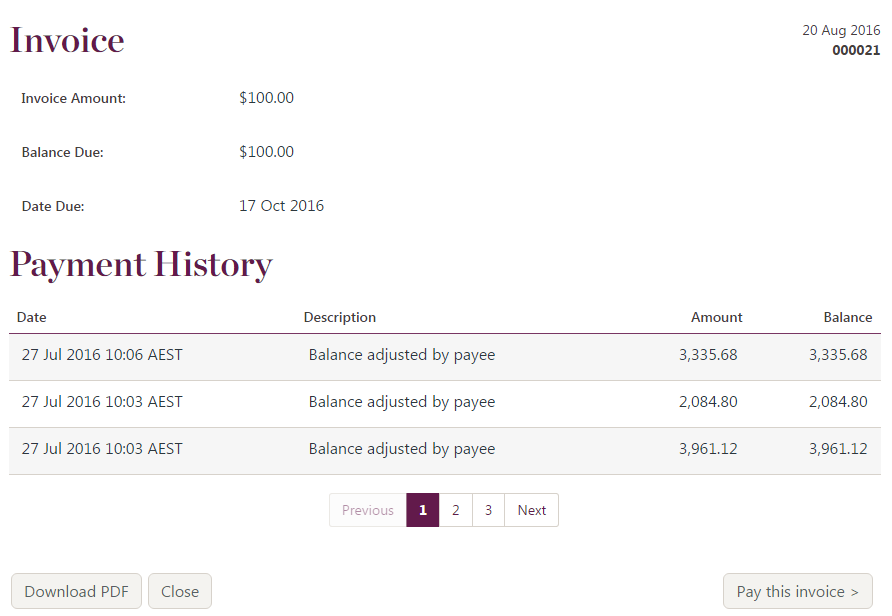
The invoice is displayed on the QuickWeb Invoicing payment page 'Choose invoices'. A modal window displays when you click on the invoice number. The details of the invoice are viewed here and when the Download button is clicked.
Download the invoice in PDF format.
Disable partial payments
You can remove the ability for your customers to perform partial payments. To disable partial payments, provide the disablePartialPayments parameter in a Secure Token Request.
Example where partial payments is turned on.
Example where partial payments is turned off.
Do not display invoice line items
Invoice line items are displayed when you provide them in the Invoice upload file. QuickWeb Invoicing will not display invoice line items unless they are provided.
Change the dispute/comment box
The comment box is displayed as a text area element. Comments are allocated to the payment and are provided in your Cash Applied File. You may change the label or the type of element. For example, display a select with dispute options. Raise this with your Westpac contact.
Bypass the account verification step
You can partially or fully bypass the account verification step as follows:
- Provide
customerReferenceNumberin a Secure Token Request to remove the Customer Reference Number field from the Account Verification step. - Provide
secondaryReferenceNumberin a Secure Token Request to remove the Outstanding Invoice Number field from the Account Verification step. - Provide both
customerReferenceNumberandsecondaryReferenceNumberin a Secure Token Request to skip the page entirely.
The payer will be taken to the Choose Invoice step. If you bypass the choose invoice step, the payer will be asked to enter their account details.
Refer to Parameters for the Secure Token Request.
Bypass the choose invoice step
You can bypass the Choose Invoice step by providing invoiceNumber in a Secure Token Request. This simulates the payer choosing an invoice from your system. The payer will be asked to enter their account details.
Change the outstanding invoice number in the account verification step to a custom lookup
The account verification step requires two pieces of information to verify a payer:
- A customer reference number
- A secondary reference number
The customer reference number uniquely identifies your customer. It is provided in the Invoice upload file. Invoices are allocated to a customer.
The secondary reference number defaults to an Outstanding Invoice Number. An outstanding invoice is one that has an outstanding balance greater than 0.00. You may wish to change this to another piece of information. You must provide this value for your customer in the Invoice upload file. Discuss this option with your Westpac contact. Charges may apply.
Register the payment account in QuickVault
You can instruct QuickWeb Invoicing to register the account used for a successful payment in QuickVault. To do this, provide the registerPaymentAccount parameter in a Secure Token Request.
See QuickVault Summary and related docs for more on QuickVault.
Restrict a payer to only card payments or bank account payments
You can instruct QuickWeb Invoicing to restrict a payer to only card payments or bank account payments. To do this, provide the accountType parameter in a Secure Token Request.
Duplicate payment checking
QuickWeb performs duplicate transaction checks in order to reduce the instances of accidental double payment.
What is a duplicate?
A transaction is considered a duplicate if there is a previous transaction that matches all these criteria:
- has the same card number (but not necessarily expiry date) or bank account BSB and account number
- is for the same merchant
- is for the same amount
- is approved or currently processing
- is not a QuickBatch transaction (but could be QuickVoice, QuickConnect, etc)
- is for the current settlement date
What is displayed to the cardholder?
The card holder is warned of the duplicate and must tick a box in order to continue processing.
Can I disable the duplicate check?
Not directly. However, the duplicate check is not performed if you are hosting the Choose Invoice page.
Verify account step failures
The account verification step requires two pieces of information to verify a payer:
- A customer reference number
- A secondary reference number
If the payer enters either piece of information incorrectly they will see an error.
If the payer enters either piece of information incorrectly 20 times, their IP address will be blacklisted by the system.
When an IP address is blacklisted, the IP address is blocked from all Qvalent services.
To have an IP address removed, a contact from your company must report this to the QuickStream Technical Support team. A member of the QuickStream Technical Support team must be able to identify you as a user of QuickStream Portal or an approved contact with the team. To update your approved contacts that are not also users in QuickStream Portal, contact the QuickStream Technical Support team when your solution goes live.
Session timeouts
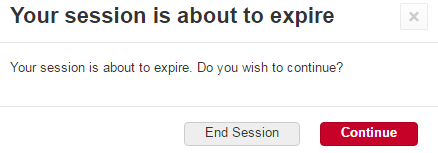
QuickWeb's session lasts for 15 minutes. After 10 minutes of inactivity, QuickWeb displays a pop-up. The pop-up warns the user that their session is about to expire.
This can occur on any page in the payment flow.
When a user selects:
- End Session, QuickWeb initiates the passback to cancelUrl.
- Continue, QuickWeb extends the users' session for another 15 minutes.
The pop-up displays for 5 minutes of inactivity. If after 15 minutes of inactivity, the user takes an action such as clicking the buttons in the popup or refreshing the page, QuickWeb redirect the user to the Session Timeout page.
This page can be branded if required.
Handoff your customer to QuickWeb
To handoff your customer from your website to QuickWeb, choose one of the following options:
Both options require you to send parameters to QuickWeb that identify you to QuickWeb and serve up your payment pages.
Secure token handoff
The secure token request is Westpac's recommended method for sending parameters. It allows the parameters to be sent directly from your server to QuickWeb. This prevents the customer from being able to tamper with the parameters before they are sent to QuickWeb.
Using the secure token handoff you can:
- Disable partial payments.
- Bypass the 'choose invoice' step.
- Bypass the account verification step.
- Change the Outstanding invoice number in the account verification step to a custom lookup type.
- Register the payment account in QuickVault.
- Restrict a payer to only card payments or bank account payments.
- Provide additional custom parameters for reporting.
- Receive a server to server payment notification.
Parameters for secure token request
These parameters are passed to QuickWeb in a Secure token request. Sign in to QuickStream Portal to get these values in each environment. See View your connection details.
Mandatory parameters
usernamepasswordsupplierBusinessCodeconnectionType=QUICKWEBproduct=INVOICING
Optional parameters
accountTyperegisterPaymentAccountcurrencyCodepaymentReference- Provide a payment level reference for the transaction. Defaults to the first invoice number in the transaction when not provided.customerReferenceNumber- Provide a customer reference number to bypass the account verification step.returnUrl- Provide the HTTPS URL to redirect the customer from the receipt page or to by-pass the receipt page and host your own.cancelUrl- Provide the HTTPS URL to redirect to when the payer cancels the payment process.errorEmailToAddressserverReturnUrlcustom<ParameterName>
In addition, the following optional parameters are specific to QuickWeb Invoicing.
secondaryIdentifier- Provide a secondary identifier to bypass the account verification step.invoiceNumber- Provide an invoice number to bypass the choose invoice step.disablePartialPayments- Providetrueto disable partial payments.
Parameters for handoff
These parameters are passed to QuickWeb in the redirect after receiving a token from the Secure token request. Sign in to QuickStream to get the communityCode value and URL in each environment. See View your connection details.
communityCodetoken
Form inputs handoff
The form inputs handoff is the second option for sending parameters to QuickWeb. It involves all the parameters being sent directly from the customer's browser to QuickWeb. It is an easier method to implement, however, it does allow the customer to tamper with the parameters before they are sent to QuickWeb. Westpac, therefore, recommends using the secure token handoff method instead.
Form handoff example
<form action="https://quickweb.westpac.com.au/OnlinePaymentServlet3" method="POST">
    <input type="hidden" name="product" value="INVOICING"/>
    <input type="hidden" name="communityCode" value="<YOUR_COMMUNITY_CODE>"/>
    <input type="hidden" name="supplierBusinessCode" value="<YOUR_SUPPLIER_BUSINESS_CODE>"/>
    <input type="hidden" name="currencyCode" value="AUD"/>
    <input type="hidden" name="returnUrl" value="https://yoursite.com.au/thankyou"/>
    <input type="hidden" name="cancelUrl" value="https://yoursite.com.au/cancelled"/>
    <input type="submit" value="Make Payment"/>
</form>
When using a form inputs handoff your customer must proceed through the account verification step.
Parameters for form inputs handoff
These parameters are passed to QuickWeb during the handoff if your website cannot perform a Secure token request. Sign in to QuickStream to get the values and URL in each environment. See View your connection details.
Mandatory parameters
supplierBusinessCodeconnectionType=QUICKWEBproduct=INVOICINGcommunityCodecurrencyCode
Optional parameters
returnUrl- Provide the URL to redirect the customer from the receipt page or to by-pass the receipt page and host your own.cancelUrl- Provide the URL to redirect to when the payer cancels the payment process.
Handoff your customer back to your website
This processing is referred to as the passback. The passback involves redirecting your customer to the URL you have specified in the returnUrl or cancelUrl parameters. This redirect has parameters that you can use to display information back to your customer on your website. The redirect is a HTTP GET by default. Raise with your Westpac contact if this should be a HTTP POST to your website.
Before implementing the pass back you must decide when you would like the customer to return to your website after a payment attempt:
- QuickWeb receipt page links to your website specified in
returnUrl. - QuickWeb redirects to your website for you to show the receipt page specified in
returnUrl.
These options are discussed in the sections below.
QuickWeb receipt page links to your website
In this option QuickWeb will display its own receipt page to the customer. The receipt page includes a button that links back to your website. The passback occurs when the customer clicks the button.
QuickWeb redirects to your receipt page
In this option QuickWeb will return the customer to your website immediately after the payment is made. That is, your customer will see the Confirm Payment page and when QuickWeb processes the payment, it will redirect the customer to returnUrl. The QuickWeb receipt page is not displayed.
Your website will then show a receipt page to the customer. QuickWeb will include a number of parameters in the redirect. They will be included as a list of ampersand delimited parameters.
The parameters that QuickWeb will return are listed in Parameters returned in passback.
Payer cancels the payment process
When a payer cancels out of the payment process (usually via a Cancel button), QuickWeb will redirect back to your website. Provide the URL in the cancelUrl parameter.
The redirect will include parameters. The receipt number will not be included as no payment was attempted. See Parameters returned in passback.
Parameters returned in passback
These parameters are passed back from the system when the process is completed.
communityCodesupplierBusinessCodepaymentAmountsurchargeAmountreceiptNumberpaymentReferencecustomerReferenceNumberresponseCoderesponseDescriptionsummaryCodecreatedDateTimesettlementDatecardholderNamecardSchemeexpiryDateMonthexpiryDateYearaccountNameaccountNumberbsbhmac- Refer to Validating the HMAC.custom<Custom name>secondaryIdentifiercommentinvoiceNumberX- For exampleinvoiceNumber1,invoiceNumber2. The invoice numbers allocated to this payment. PairinvoiceNumber1withpaymentAmount1and so on.paymentAmountX- For examplepaymentAmount1,paymentAmount2. The invoice amount allocated to this payment. PairpaymentAmount1withinvoiceNumber1and so on.preregistrationCode
Receiving payment details
There are two ways to receive payment details:
Server to server notification
This option is also known as the server-to-server postback. It allows you to receive payment summary details after each card payment is made. This is done via a HTTPS POST to your server. The payment details are posted as form parameters or as XML.
Parameters in the server to server notification
These parameters are present in the server to server notification:
sourceCodereceiptNumbercommunityCodesupplierBusinessCodepaymentReference- Provided inpaymentReferenceduring handoff. If it was not provided, it is first invoice number paid in the transaction. Seeinvoice/invoiceNumberfor other invoices.customerReferenceNumber- A customer-level reference. Provided insupplierBusinessCodeduring handoff or entered in the verify account step. The invoices belong to this customer.paymentAmountsurchargeAmountcardSchemesettlementDatecreatedDateTimeresponseCoderesponseDescriptionsummaryCodesuccessFlag- Custom fields
These parameters relate to an invoice-allocated payment:
invoice/invoiceNumberinvoice/paymentAmountcomment
Refer to Server to server notification for the full specification.
An example XML response
POST /payments HTTP/1.1
Host: yoursite.com.au
Content-Type: application/xml

<PaymentResponse>
    <sourceCode>net</sourceCode>
    <receiptNumber>1003548481</receiptNumber>
    <communityCode><YOUR_COMMUNITY_CODE></communityCode>
    <supplierBusinessCode><YOUR_SUPPLIER_CODE></supplierBusinessCode>
    <customerReferenceNumber>CUSTOMER1</customerReferenceNumber>
    <paymentReference>PAYMENT1</paymentReference>
    <paymentAmount>624.00</paymentAmount>
    <surchargeAmount>24.00</surchargeAmount>
    <cardScheme>VISA</cardScheme>
    <settlementDate>20170110</settlementDate>
    <createdDateTime>10 Jan 2017 01:11:31</createdDateTime>
    <responseCode>00</responseCode>
    <responseDescription>Approved or completed successfully</responseDescription>
    <summaryCode>0</summaryCode>
    <successFlag>true</successFlag>
    <invoice>
        <invoiceNumber>INVOICE1</invoiceNumber>
        <paymentAmount>100.00</paymentAmount>
    </invoice>
    <invoice>
        <invoiceNumber>INVOICE2</invoiceNumber>
        <paymentAmount>200.00</paymentAmount>
    </invoice>
    <invoice>
        <invoiceNumber>INVOICE3</invoiceNumber>
        <paymentAmount>300.00</paymentAmount>
    </invoice>
    <comment/>
</PaymentResponse>
Cash applied file
See Cash applied file for the file format.
The file may be retrieved using iLink or available for download in QuickStream Portal.
To download a Cash applied file from QuickStream Portal:
- Sign into QuickStream Portal
- Click Administration -> Transactions and Reports -> Facility Reports
- Your report will appear on this page.
Select the download icon to retrieve a Cash applied file. Use the date filters to find older files.
Manage your security settings
Refer to QuickStream user guide - Security settings to manage the following security settings in QuickStream:
- Whitelist the IP addresses for the Secure Token Requests
- Whitelist the domain addresses for the Server to server notification
- View your connection details, including your credentials for authentication with QuickStream.
Invoice upload request file
The Invoice upload file is a comma-separated value (CSV) file. The following sections describe the fields for each record type in the file format.
Record type
There are three record types
- C - Indicates the Customer details record type. It includes all applicable values for a Customer.
- I - Indicates the Invoice details record type. It includes all applicable values for an Invoice.
- L - Indicates the Invoice line item details record type. It includes all applicable values for an Invoice line item.
Customer details
The following fields can be used to send only customer details into QuickStream.
| Column Heading | Description | Mandatory | Min Length | Max Length | Field Validation | Sample Value |
|---|---|---|---|---|---|---|
| RecordType | C - indicates a Customer details record. |
Yes | 1 | 1 | Must be C |
C |
| CustomerNumber | Unique customer number.
|
Yes | 1 | 100 | Case-sensitive. Numbers and letters only. | CUSTOMER1 |
| CustomerName | The customer name. This can be the name of an individual or business. | Yes | 1 | 100 | Numbers, letters, underscores, apostrophes, ampersands, periods and hyphens only. | John's Cakes |
| CustomerStatus | The status of the customer. Disabling a customer will also disable the customer's:
Be mindful if you have other QuickStream processes that rely on a customer's accounts and recurring payments being enabled. |
Yes | 6 | 7 | One of:
|
ENABLE |
| EmailAddress | The customer's contact email address. | No | 5 | 128 | A valid email address. | john@johnscakes.biz.au |
| PhoneNumber | The customer's contact phone number. Where your solution requires notifications to the customer via SMS, this phone number must be a mobile phone number. |
No | 10 | 12 | A valid phone number including the area code, and optionally the country code prefixed by a +. For example, +61xxxxxxxxx, 0xxxxxxxxx. |
+61421559774 |
| AddressLine1 | The first line of the customer's address. | No | 3 | 128 | Numbers, letters, underscores, apostrophes, ampersands, periods and hyphens only. | Unit 11 |
| AddressLine2 | The second line of the customer's address. | No | 3 | 128 | Numbers, letters, underscores, apostrophes, ampersands, periods and hyphens only. | Level 31 |
| AddressLine3 | The third line of the customer's address. | No | 3 | 128 | Numbers, letters, underscores, apostrophes, ampersands, periods and hyphens only. | Building A |
| AddressLine4 | The fourth line of the customer's address. | No | 3 | 128 | Numbers, letters, underscores, apostrophes, ampersands, periods and hyphens only. | Sunset Blvd |
| City | The city name of the customer's address. | No | 3 | 128 | Numbers, letters, underscores, apostrophes, ampersands, periods and hyphens only. | Sydney |
| State | The state of the customer's address. For non-Australian addresses, we recommend you do not provide a value. |
No | 2 | 3 | For Australian addresses, we recommend you use one of the following state codes ACT, NSW, QLD, NT, SA, WA, TAS, VIC. |
NSW |
| PostalCode | The postal code of the customer's address. | No | 4 | 4 | Numbers only. | 2000 |
| Country | The country code of the customer's address | No | 2 | 2 | The two character ISO country code | AU |
| PreferredNotificationMedium | The preferred notification medium for the customer. | No | 3 | 11 | One of:
|
EMAIL |
Invoice details
The following fields can be used to send only invoice details into QuickStream. Provide 0-1000 invoices per Customer details record.
| Column Heading | Description | Mandatory | Min Length | Max Length | Field Validation | Sample Value |
|---|---|---|---|---|---|---|
| RecordType | I - indicates an Invoice details record. |
Yes | 1 | 1 | Must be I |
I |
| InvoiceNumber | Unique invoice number | Yes | 1 | 40 | Case-sensitive. Numbers, letters, underscores and hyphens only. | INV123456 |
| Purchase Order Number | A purchase order number can be displayed on invoices. | No | 1 | 40 | Case-sensitive. Numbers, letters, underscores and hyphens only. | PO123456 |
| InvoiceAmount | The total amount of the invoice. | Yes | 4 | 10 | A negative, non-zero or positive dollar amount in the format 0.00.For example, 0.01, 1.01, -10.00, 100.50, 1000.75, 100000.00 etc.
|
100.00 |
| OutstandingAmount | The outstanding amount of the invoice. | Yes | 4 | 10 | A negative, non-zero or positive dollar amount in the format 0.00.For example, 0.01, 1.01, -10.00, 100.50, 1000.75, 100000.00 etc.
|
50.00 |
| Currency | The ISO currency code. | No | 3 | 3 | One of: AUD, NZD. Defaults to AUD. |
AUD |
| InvoiceDate | The date of the invoice | Yes | 10 | 10 | A value date in the format dd MMM yyyy.
01 Jan 2016 |
01 Jan 2016 |
| DueDate | The due date of the invoice | Yes | 10 | 10 | A value date in the format dd MMM yyyy.
01 Jan 2016 |
01 Jan 2016 |
Custom invoice data fields
Provide 0-20 custom data key-value pairs per Invoice detail record. Use these fields to:
- Provide additional data for display in QuickWeb Invoicing.
- If they must be passed back to you for payments made to invoices in a Cash Applied File.
Append the following fields to the end of the Invoice detail record.
| Column Heading | Description | Mandatory | Min Length | Max Length | Field Validation | Sample Value |
|---|---|---|---|---|---|---|
| CustomDataKey | A code to unique identify this custom data. Communicate this code to your Westpac contact. | Yes - when CustomDataValue is provided. | 1 | 20 | Case-sensitive. Numbers, letters, underscores and hyphens only. | customMessage |
| CustomDataValue | The value of the previous CustomDataKey. | Yes - when CustomDataKey is provided. | 1 | 100 | Numbers, letters, underscores, apostrophes, ampersands, periods and hyphens only. | Custom Message 1 |
Invoice line item details
The following fields can be used to send only invoice line item details into QuickStream. Provide 0-40 invoice line items per Invoice detail record.
| Column Heading | Description | Mandatory | Min Length | Max Length | Field Validation | Sample Value |
|---|---|---|---|---|---|---|
| RecordType | L - indicates an Invoice Line Item details record. |
Yes | 1 | 1 | Must be L |
L |
| LineItemNumber | Unique invoice line item number. | Yes | 1 | 20 | Case-sensitive. Numbers, letters, underscores and hyphens only. | LI123456 |
| Description | A customer friendly description of the line item. | No | 1 | 200 | Numbers, letters, underscores, apostrophes, ampersands, periods and hyphens only. | Service Fee for Bike Repair |
| ProductCode | A product code. | No | 1 | 20 | Case-sensitive. Numbers, letters, underscores and hyphens only. | SERVICEFEE |
| ProductName | A product name. | No | 1 | 100 | Numbers, letters, underscores and hyphens only. | Service Fee |
| NumberOfUnits | The number of units. | Yes - when Unit Amount is provided. | 6 | 10 | A zero or positive number in the format 0.####. For example, 0, 0.1, 0.1000, 10.0001, 100 etc. |
10 |
| UnitOfMeasurement | The unit of measurement. | No | 1 | 20 | Numbers, letters, underscores and hyphens only. | EA |
| UnitAmount | The amount per unit. | Yes - when Number of Units is provided. | 4 | 10 | A negative, non-zero, or positive dollar amount in the format 0.00. For example, 0.01, 1.01, -10.00, 100.50, 1000.75, 100000.00 etc. |
10.00 |
| LineItemAmount | The total line item amount. | Yes | 4 | 10 | A negative, non-zero, or positive dollar amount in the format 0.00. For example, 0.01, 1.01, -10.00, 100.50, 1000.75, 100000.00 etc.Does not necessarily equal UnitAmount * NumberofUnits. |
100.00 |
Custom invoice line item data fields
Provide 0-20 custom data key-value pairs per Invoice line item detail record. Use these fields to provide additional data for display in QuickWeb Invoicing. This data is not provided in a Cash Applied File.
Append the following fields to the end of the Invoice line item detail record.
| Column Heading | Description | Mandatory | Min Length | Max Length | Field Validation | Sample Value |
|---|---|---|---|---|---|---|
| CustomDataKey | A code to unique identify this custom data. Communicate this code to your Westpac contact. | Yes - when CustomDataValue is provided. | 1 | 20 | Case-sensitive. Numbers, letters, underscores and hyphens only. | customMessage |
| CustomDataValue | The value of the previous CustomDataKey. | Yes - when CustomDataKey is provided. | 1 | 100 | Numbers, letters, underscores, apostrophes, ampersands, periods and hyphens only. | Custom Message 1 |
Sample file
The following sample contains a value for all fields. This file would create/update a customer, one invoice for that customer with a single invoice line item.
"C","JOHNSMITH","John B. Smith","ENABLE","jsmith@customer.com","+61421559774","Unit 11","Level 31","Building A","Sunset Blvd","Sydney","NSW","2000","AU","EMAIL"
"I","INV123456","","100.00","50.00","","01 Jan 2016","01 Jan 2017","customMessage","Custom Message 1"
"L","LI123456","Service Fee for Bike Repair","SERVICEFEE","Service Fee","10","EA","10.00","100.00","customDescription","Custom Description 1"
The following sample contains only the mandatory fields. This file would create/update a customer, one invoice for that customer with a single invoice line item.
"C","JOHNSMITH","John B. Smith","ENABLE","","","","","","",","","","",""
"I","INV123456","","100.00","50.00","","01 Jan 2016","01 Jan 2017"
"L","LI123456","","","","","","","100.00"
File naming
There's no set standard for naming the Invoice upload request file. However to assist in preventing file duplication, we recommend the following format:
[CommunityCode]_INVOICEUPLOAD_[ddMMyyyyHHmmss].csv
[CommunityCode]is a value provided by QuickStream. You can find this in QuickStream Portal in the upper right underneath the navigation menu.[ddMMyyyyHHmmss]is the date and time the file was created by your systems inddMMyyyyHHmmss format. For example, if the file was created on 15 June 2016 at 05:13:52PM you will represent this as15062016171352.
For example, if your community code is MYCOMPANY, and your systems created the file on 15 June 2016 at 05:13:52PM, then the file name is
MYCOMPANY_INVOICEUPLOAD_15062016171352.csv


