Tutorials and troubleshooting
Explore the following tutorials for help using the QuickStream REST API.
Explore the API using Postman
Postman is a HTTP client for testing RESTful web services. Use Postman when you wish to explore the QuickStream REST API.
Note: If you choose to use Postman you should follow the security best practices as per the Postman documentation
Step 1: Install Postman
- Install Postman for Windows/MacOS/Linux.
Step 2: Use API key for Basic Auth
- Start Postman.
- Click the Authorization tab.
- Select Basic Auth from the menu.
- Enter your Publishable API key into the Username field.
- Press Update request
Step 3: Explore the API from the root resource
- In Postman's URL bar, select GET.
- Enter the URL
https://api.quickstream.westpac.com.au/rest/v1orhttps://quickapi.paymentsonline.co.nz/rest/v1(New Zealand). - Press Send.
- Click links in the response to open them in a new tab in Postman. Use Postman to send requests to these resources.
Step 4: Sending content in the body
- Click on the Body tab, and choose the "raw" radio option, then change the dropdown from "Text" to "JSON (application/json)".
- Enter the JSON data for the request.
Step 5: Download the API Collection
These files are used to import the QuickStream REST API Collection of API's into Postman for use and testing.
| Version | File | Description | Date |
|---|---|---|---|
| 1.0.0 | API Collection | A Collection of API calls for testing | 01/01/2024 |
Setup and Variables
The following variables need to be set before making requests
Collection Variables:
- secretKey: See API credentials to access your secret key
- publishableKey: See API credentials to access your publishable key
- supplierBusinessCode
Resource Specific variables:
- customerId
- accountToken
- recurringPaymentId
- agreementToken
If the Resource specific variables are known they can be set the same way to Collection variables are set.
The following variables will be set automatically upon posting to certain endpoints
- singleUseTokenId: after posting to single-use-tokens
- receiptNumber: after posting to transactions
- agreementToken: after posting to payto-agreements
To test your network connectivity and API credentials are working correctly, use the Root API.
Trusted Frame
Use the Trusted Frame on your web page to collect card or bank account details for tokenisation or payment.
Payment Request Button
Use the Payment Request Button on a web page to take a one-off card payment using Apple Pay or Google Pay.
Determining wallet acceptance
To determine if Apple Pay or Google Pay is accepted in your facility and available in the client:
- Provide the
onInitialisecallback function in thePaymentRequestConfigObject - Check the resulting
PaymentRequestInitialisedObject.
Customising the button
To implement a customised Apple Pay or Google Pay button:
- Set
customButtontotruein thePaymentRequestConfigObject. This will disable rendering of the default button. - Use this in combination with the
onInitialisecallback to render your own button inside thepaymentRequestApplePayButtonContainerorpaymentRequestGooglePayButtonContainerelement. - Refer to Apple Pay on the Web - Displaying Apple Pay Buttons Using CSS and Google Pay for Payments - Customize your button .
Accepting debit cards only
To accept only debit cards:
- Sign in to QuickStream and check that your business is configured to only accept debit cards.
- Use the
supplierBusinessCodevalue for your business in your Payment Request Button integration. - Google and Apple wallets will display only debit cards in your wallet.
Requesting shipping
To request shipping and handle shipping changes:
-
Create the PaymentRequestConfigObject with
shippingOptions,options.requestShipping=true,onshippingaddresschangeandonshippingoptionchangeproperties.var config = { supplierBusinessCode: "SUPPLIER_CODE", googleMerchantId: "YOUR_GOOGLE_MERCHANT_ID", details: { total: { label: "Your company name", amount: { value: "10.00", currency: "AUD" } }, shippingOptions: [{ "id": "FreeShip", "label": "Free Shipping (5 to 7 days)", "amount": { value: "0.00", currency: "AUD" } }] }, options: { requestShipping: true }, onshippingaddresschange: handleShippingAddressChange, onshippingoptionchange: handleShippingAddressChange }; -
When then payer selects to pay and changes their shipping address or shipping option, QuickStream-API.js calls the
onshippingaddresschangeandonshippingoptionchangefunctions respectively.Each method receives an
eventobject. Validate the shipping details changes and callevent.updateWithto update the total payment amount.function handleShippingAddressChange(event) { event.updateWith({ total: { label: "Your company name", amount: { value: newTotal, currency: "AUD" } } }); } -
Create the Payment Request Button with the PaymentRequestConfigObject.
Handle errors or retrieve the
singleUseTokenId,shippingAddress,shippingOptionproperties from the PaymentRequestResponseObject.QuickstreamAPI.paymentRequestButton.createAllButtons(config, function(errors, paymentResponse) { if (errors) { // Handle errors here } else { console.log("singleUseTokenId is " + paymentResponse.singleUseTokenId); console.log("shippingAddress is " + paymentResponse.shippingAddress); console.log("shippingOption is " + paymentResponse.shippingOption); // perform the payment on your server here before calling below. paymentResponse.complete("success"); } });
Surcharging
Surcharges work the same as any card payments:
- The Apple Pay or Google Pay credential (i.e. DPAN or FPAN) is sent to QuickStream.
- QuickStream calculates the surcharge based on the Card Scheme Surcharges configuration on your facility.
The payment sheet for Apple and Google Pay will show by default <Supplier Business Name> (surcharge may be added) when surcharging is configured. <Supplier Business Name> is truncated to 18 characters to ensure the label displays correctly.
You may change this label during:
- the initialisation of the payment sheet,
- in the
onShippingAddressChangeevent, and - in the
onShippingOptionChangeevent.
See the details.total.label property.
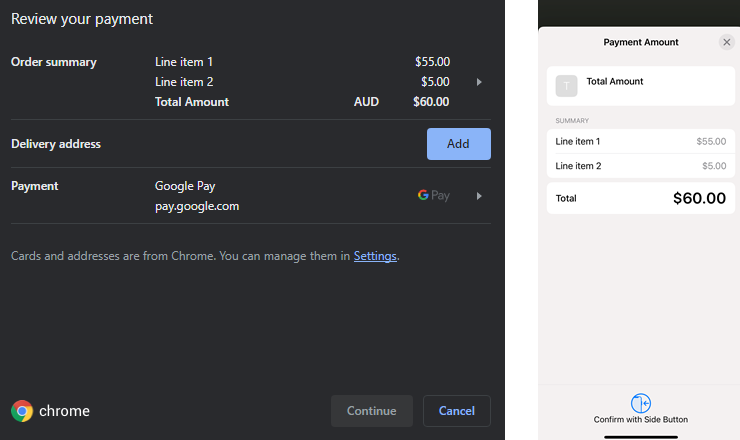
Displaying line items
To display line items you can add the 'displayItems' array to the 'details' property for the 'config' variable when you create the Payment Request Button. The 'displayItems' array contains values for the line item label and the amount to be displayed for that line. Multiple line items can be added to be displayed following the example below.
var config = {
  details: {
    displayItems: [
      {
        label: "Line item 1",
        amount: {currency: "AUD", value: "55.00"}
      },
      {
        label: "Line item 2",
        amount: {currency: "AUD", value: "5.00"}
      }
    ],
    total: {
      label: "Total amount",
      amount: {currency: 'AUD', value: "60"}
    }
  }
};
The line items that are added to the 'config' variable will then be displayed in the order summary when on the review your payment page. These multiple line items could be useful when you want to provide the breakdown of the total amount or to display the surcharge amount that is added onto the total. See below for the outcome of adding multiple line items to the Payment Request Button.
Upload payment files
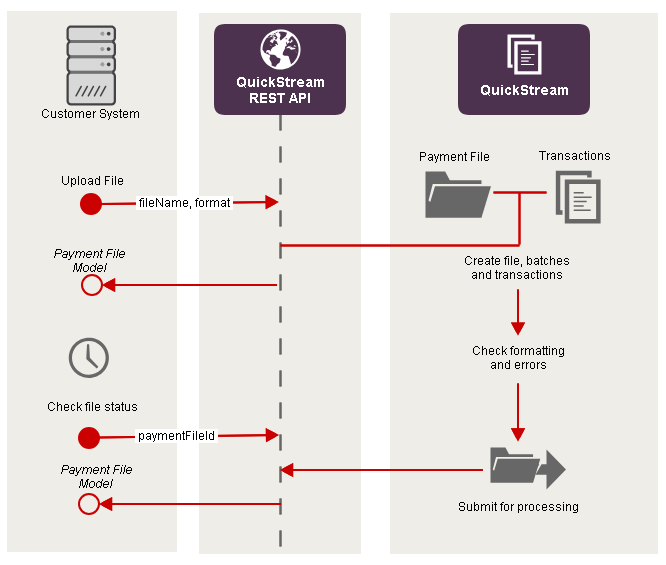
This is a common scenario where you want to upload a payment file to process transactions in bulk.
See also Using curl to upload a payment file.
| Step | Description |
|---|---|
| 1 | Create a payment file in one of the available formats. |
| 2 | Upload the payment file. Set the file parameter to the file name. Set the format parameter to the format of the payment file. The API responds with a Payment File Model. The paymentFileId property is the unique identifier for a payment file. The status property describes the processing status of the payment file. |
| 3 | Get the payment file later to check the status. |
| 4 | If the file has errors, list and report them to your team internally. Fix the errors and upload the file again with a new file name. |
| 5 | If the file is processing, wait until it is in the COMPLETE status. |
| 6 | Your server may check the status of each payment batch in the file. The API returns a Payment Batch Model. Your server may also check the status of each transaction. The API returns a Transaction Response Model. |
| 7 | When the file status is COMPLETE your server will download the transaction report in one of the of the available formats. |
Use curl to check network
For your software to work, your server must be able to connect to QuickStream. Follow these details to determine if there is a problem with your network or your software.
Step 1: Download and install curl
Download and install the curl client for your platform from http://curl.haxx.se/download.html. Be sure to download the correct distribution for your server's operating system. You must download a version that includes SSL support.
If you are using Windows, we recommend that you download the binary distribution listed under the heading Win32 - Generic labelled Win32 2000/XP, binary and SSL and maintained by Gunter Knauf. This document does not provide a direct link because you should always download the latest version.
Step 2: Get the root resource for the API
To test if your server can connect to QuickStream:
curl -i --basic --user "{publishableApiKey}:" {baseURL}Replace {publishableApiKey} with your Publishable API Key. Replace {baseURL} with the Base URL for the environment you're working in.
Using curl to upload a payment file
Use this tutorial to upload a payment file. Complete the curl network connectivity tutorial first to ensure curl can connect to QuickStream.
See also Upload payment files.
Step 1: Generate a payment file
Your software must generate a file in one of the payment file formats. Each file must have a unique name.
In this tutorial, we assume the file is called example.csv.
Step 2: Save API key to file
-
Enter the following into a text file:
curl basic user={secretApiKey}: silent show-error fail -
Replace
{secretApiKey}with your Secret API Key. -
Save the file as
quickstream-curl-config.txt.
Step 3: Upload a payment file
To upload a payment file:
curl --config quickstream-curl-config.txt -F "file=@example.csv" {baseURL}/payment-filesReplace {baseURL} with the Base URL for the environment you're working in.
Step 4: Improve your solution
You may now improve your solution by:
- Logging errors
- Automating the process by creating a scheduled task. Refer to your operating system's documentation.
- Polling the status of your file.
- Downloading errors in your file and reporting them to staff.
Handling service outage using quickstream-api.js
If QuickStream-API.js cannot be retrieved (such as during a service outage), handle it by checking if window.QuickstreamAPI exists.
For example
if( window.QuickstreamAPI ) {
    QuickstreamAPI.init( {
        publishableApiKey: "{publishableAPIKey}"
    } );
    ...
} else {
    // handle error
    document.forms[0].innerHTML = '<div class="alert">This service is unavailable. Please check back shortly.</div>';
}
Displaying card scheme logos using quickstream-api.js
Using QuickStream-API.js you can display card scheme logos based on the setup of your QuickStream facility.
To do this:
- Use
QuickstreamAPI.creditCards.getAcceptedCards( 'SUPPLIER_BUSINESS_CODE', callback );to retrieve a list of the credit card types accepted for that facility. - In your callback function, for each card scheme code display an appropriate card scheme logo.
- The data also contains the surcharge rate you've set for each card scheme.
For example
QuickstreamAPI.init( {
    publishableApiKey: "{publishableAPIKey}"
} );
QuickstreamAPI.creditCards.getAcceptedCards( "SUPPLIER_BUSINESS_CODE", function( errors, data ) {
    if( !errors ) {
        data.forEach( function( acceptedCard ) {
            switch ( acceptedCard.cardScheme ) {
                case "VISA" :
                    // Show the card scheme logo
                    break;
                case "MASTERCARD" : break;
                case "AMEX" : break;
                case "JCB" : break;
                case "UNIONPAY" : break;
            }
        } );
    }
} );
You can download and use the latest card scheme logos below. Do not link to a logo URL directly as they may change.
| Card Scheme Logo | Code |
|---|---|
VISA |
|
MASTERCARD |
|
AMEX |
|
UNIONPAY |
Validating credit card fields using quickstream-api.js
Using QuickStream-API.js you can validate credit card fields.
To do this:
- Create a form with elements having the
data-quickstream-apiattribute. - Use
QuickstreamAPI.creditCards.getCardScheme( form, callback );to retrieve the card scheme type from the credit card BIN. - Use
QuickstreamAPI.creditCards.validateCardNumber( form, callback );to validate a credit card number. - Use
QuickstreamAPI.creditCards.validateExpiryDate( form, callback );to validate the expiry date fields - Use
QuickstreamAPI.creditCards.validateCvn( form, callback );to validate the CVN.
For example
QuickstreamAPI.init( {
    publishableApiKey: "{publishableAPIKey}"
} );

// retrieve the card type from the credit card BIN.
QuickstreamAPI.creditCards.getCardScheme( form, function( errors, data ) {
    if( !errors ) {
        switch( data ) {
            case "VISA" : break;
            case "MASTERCARD" : break;
            case "AMEX" : break;
            case "UNIONPAY" : break;
        }
    }
} );

// validate the card number entered
QuickstreamAPI.creditCards.validateCardNumber( form, function( errors, data ) {
    if( !errors && data.isValid ) {
       // card number is valid
    }
} );

// validate the expiry date
QuickstreamAPI.creditCards.validateExpiryDate( form, function( errors, data ) {
    if ( !errors ) {
        // expiry date is valid
    } else {
        errors.forEach( error ) {
            if( error.fieldName == "expiryDateMonth" ) {
                // handle month error
            } else if ( error.fieldName == "expiryDateYear" ) {
                // handle year error
            }
        }
    }
} );

// validate the CVN
QuickstreamAPI.creditCards.validateCvn( form, function( errors, data ) {
    if ( !errors ) {
        // CVN is valid
    }
} );
Transaction error handling
This API responds with Errors when a request is not processed successfully. When a transaction request is successfully processed this API returns a Transaction Response Code. Error information is provided in the summaryCode and a description of the error in the responseCode and responseDescription fields in the Transaction Response Model.
Use the table below to determine the appropriate system behaviour for each summaryCode.
| Summary Code | Description | Recommended System Action |
|---|---|---|
0 |
Transaction Approved | Transaction is successful. No further action required. |
1 |
Transaction Declined | Transaction has been declined by the financial institution. See Transaction Response Code for common response codes. In many cases, the problem can be addressed by either:
05) may require offline follow up with the financial institution that issued the card. |
2 |
Transaction Erred | Transaction is of an unknown status. See Summary code 2 below. |
3 |
Transaction Rejected | Transaction request has been rejected by the API, often due to invalid system configuration. This is similar to the Transaction Declined (summaryCode of 1) in terms of error handling. Refer to the detailed response code and either:
|
Summary code 2
A transaction may be received and processed by a financial institution but a system or network error may occur such that a response is not returned. Given that QuickStream does not know the status but it may have been successfully approved and the card debited, we must return the "Transaction Erred" status summaryCode = 2. An outage with the financial institution may last for some time and therefore your exception handling process must handle this rare but possible situation.
The recommended action is as follows:
- Request GET
/transactions/{receiptNumber}. The API returns the most recent response and may be different to the response originally received. - If
summaryCodeis0,1or3in the response, then the transaction may be handled as if the response was received on the first attempt. - If
summaryCodeis2after the first attempt, the transaction should be marked as held within your system. As the transaction may have been processed, it is not recommended that the transaction be retried by creating a new transaction. Your system should indicate to the end user that the status of the transaction is unknown and that they should contact your customer service personnel during applicable hours or provide a receipt number and contact the end user if the transaction is subsequently found to fail. - If
summaryCodeis2after initial attempts, request GET/transactions/{receiptNumber}after settlement cutoff to try to automatically determine the status. QuickStream has processes in place to try to update these transactions with the final status and will endeavour to have statuses updated by settlement cutoff. This means that in many cases, the status will be available automatically if re-queries are attempted after this time. - If
summaryCodeis2after settlement cutoff, we recommend re-querying at the same time on the following day as it may take up to 48 hours for the final status of transactions to be updated under some circumstances. - For transactions that remain unresolved, your customer service would then try to resolve the situation by first using QuickStream Portal to query the transaction status. If this does not resolve the issue, the exception details should be communicated to QuickStream Technical Support for resolution. This would require details on the original transaction (particularly the
receiptNumber), responses and exception handling actions attempted thus far.
Some customers, with a need for minimal customer impact of outages, have implemented additional business logic that tries to protect the end customer from such issues. As this may be useful in your implementation, a typical process is as follows:
- If an API call returns a summaryCode of
0,1or3then your system handles this as per normal. - If an API call returns a summaryCode of
2then your system handles this by returning a receipt number to the end customer and then tries to determine the transaction result in the background. This ensures that the end customer is not impacted by an outage period. If the transaction subsequently fails, this will require handling through an internal customer care process and may require contact with the end customer.
Troubleshooting
HTTP status codes other than 200
See: HTTP Status Codes.
curl: (60) SSL Certificate Problem: Unable to get local issuer certificate
Your server does not trust the server TLS certificate presented by QuickStream. Typically this is due to an out-dated root CA certificate bundle on your server. Download and install an updated root certificate for your server.
curl: (56) Received HTTP code 407 from proxy after connects
Your network has a proxy server. To test if your server can connect to QuickStream through the proxy server:
curl --proxy {proxyServer} --proxy-user {proxyUsernamePassword} -i --basic --user "{publishableApiKey}:" {baseURL}Your software must connect to QuickStream through the proxy server.
curl: (6) Couldn't resolve host 'api.quickstream.westpac.com.au' or 'api.quickstream.support.qvalent.com'
(or quickapi.paymentsonline.co.nz or quickapi-test.paymentsonline.co.nz)
DNS resolution failed. You may need to authenticate with your proxy server.