QuickVault API registration
QuickVault API registration is a Westpac hosted service that allows you to tokenise customer card details with Westpac. This is done via an Application Programming Interface (API). Once registered these card details can be used by any of your Westpac payment solutions.
This document describes the QuickVault solution and explains how to register accounts using the API registration option. High level requirements as well as detailed step-by-step instructions are included to help with the implementation process.
The intended audience for this document is the software development team responsible for integrating their systems with QuickVault.
What is QuickVault?
QuickVault is a Westpac service that allows you to store a customer's card details or bank account details securely outside of your system. This process is commonly referred to as preregistering customer account details with Westpac.
The primary purpose of QuickVault is to help your card solution become PCI DSS compliant. The term PCI DSS stands for Payment Card Industry Data Security Standard. It is a security standard that has a number of requirements for processing, transmitting and storing card details. QuickVault has attained Level 1 PCI DSS compliance - the highest level achievable. To learn more about PCI DSS visit https://www.pcisecuritystandards.org/security_standards/pci_dss.sHTML. Learn more about Security.
Westpac offers a range of solutions for capturing account details and transmitting account details to QuickVault. The range includes:
- A variety of web based registration solutions
- An API registration solution
- A file based registration solution
This document focuses on the file based registration solution, called API registration. For information about the other solutions please read the QuickVault Summary Guide.
What is API registration?
API registration is a Westpac hosted service that allows you to preregister customer card details with Westpac. This is done via an Application Programming Interface (API). Once registered these card details can be used by any of your Westpac payment solutions.
To register a card your system will send an API Request to QuickVault. This request will contain details about the card you wish to register. QuickVault will then process the request, store the card details and send an API Response back to your system. The response will indicate whether the account was successfully registered.
The key feature of API registration is its ability to provide a real-time, synchronous response when you attempt to register a card. This removes the complexities of issuing a request then having to process a separate response message sometime in the future. With API registration, your system will send the request then receive a response back in the same call, all in real-time.

How does the registration process work?
This section shows the sequence of events that occur when an account is registered via API registration. It assumes you are using API registration in conjunction with a set of registration webpages.
To help explain the process, two diagrams have been included:
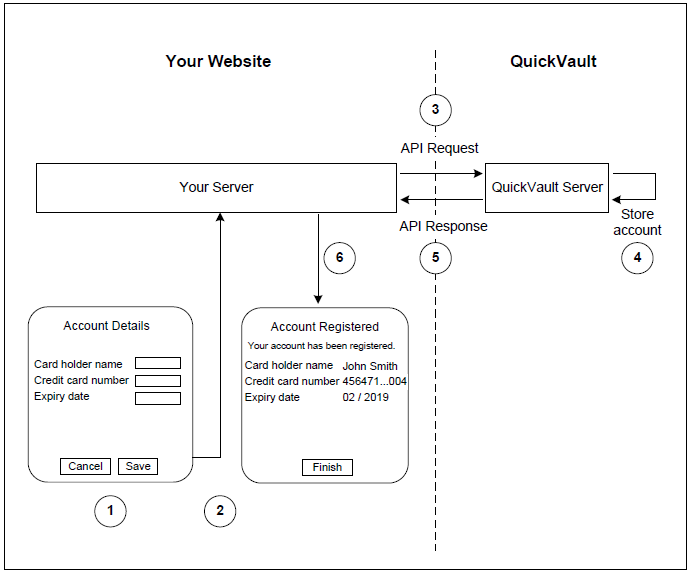
The diagram below shows the webpages that are involved and demonstrates the interaction between your server and QuickVault.
The diagram below is a sequence diagram that provides additional information about each step. The section highlighted within the grey box (steps 3-5) shows the API registration steps. These steps apply to any implementation that uses API registration. The steps outside of the box are additional steps that are provided for context only. They relate to the registration webpages.
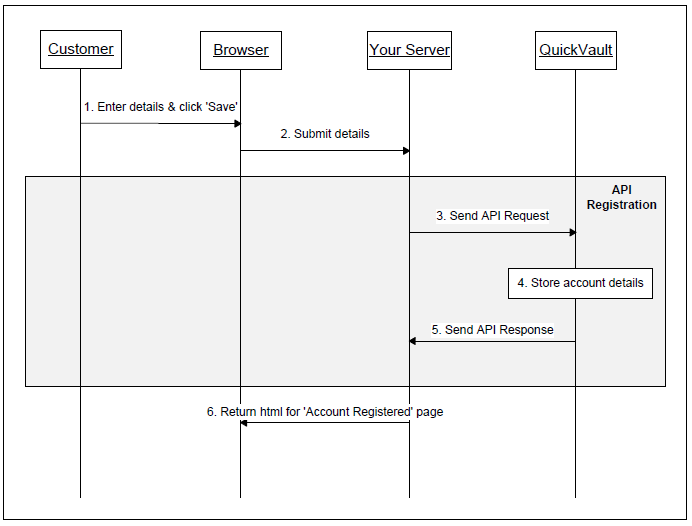
The steps for the above diagrams are as follows:
-
The customer visits your website and enters their account details into your 'Account Details' page.
-
When the 'Save' button is clicked the customer's browser posts the account details to your server.
This step results in account details entering your system. This exposes your system to sensitive card information and makes it more difficult for your solution to become PCI DSS compliant. If you would like to avoid having card details enter your system, consider using a different registration method. Read the QuickVault summary guide for alternative registration options.**API registration begins here.** -
Your server sends an API Request to QuickVault. The request contains the customer's account details. This process is discussed in Connecting to QuickVault and Sending an API Request.
-
QuickVault stores the customer's account details.
-
QuickVault returns an API Response to your server. The response indicates whether the account was successfully registered. This step is discussed in Receiving an API Response. API registration ends here.
-
Your server builds the HTML for the 'Account Registered' page (or your preferred page) then returns the HTML to the customer's browser.
Implementation process
There are a number of tasks involved in the implementation process. Each task is described in detail in the following sections of this document. A summary of the tasks and their corresponding section number is listed in the table below.
| Step | Document Reference |
|---|---|
| Step 1 | Kick-off Meeting |
| Step 2 | Identifying the account model |
| Step 3 | Generating the account token |
| Step 4 | Connecting to QuickVault |
| Step 5 | Sending an API Request |
| Step 6 | Receiving an API Response |
| Step 7 | Receiving a daily Registered Accounts Report |
| Step 8 | Identifying expiring cards |
| Step 9 | Testing |
| Step 10 | Sign off |
| Step 11 | Production lodgement |
| Step 12 | Go live |
| Step 13 | Post implementation |
To help with the implementation process, we have included a requirements checklist for you to complete as you work on each task. The purpose of the requirements checklist is to help identify and keep track of your requirements.
If you require further assistance, please contact your Westpac Implementation Manager or your Qvalent implementation manager.
Kick-off meeting
The kick-off meeting is the first meeting between your organisation and Qvalent. This typically consists of a telephone conference with the relevant people from your organisation, Westpac and Qvalent.
The purpose of this meeting is to, introduce the team members from each organisation, discuss the implementation process and discuss your requirements.
Identifying the account model
One of the first tasks in the implementation process is to identify what type of account model you have. The account model identifies the number of accounts a customer is allowed to have. There are two options available. You can choose either:
Single account model
The single account model allows a customer to have one account registered. This account will be used every time the customer makes a payment. The account details can be replaced, but there can never be more than one account active.
The following diagram shows an example of the single account model.

In order for your solution to use the single account model all of your customers must be structured this way. If any of your customers have more than one active account you must use the multiple account model instead.
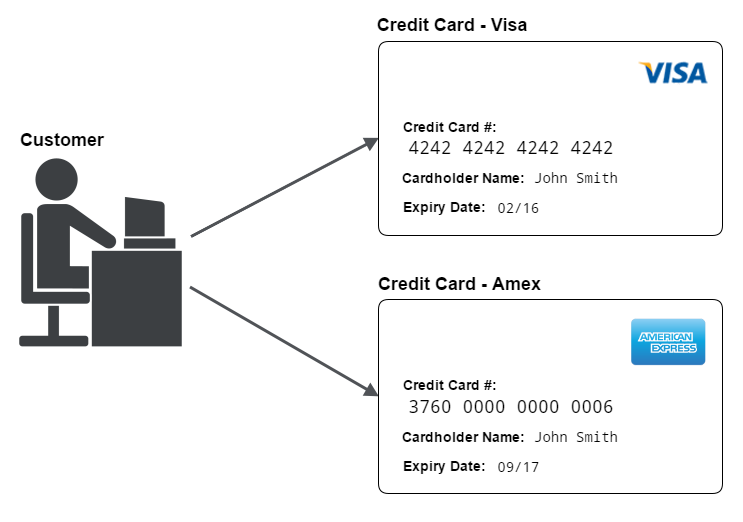
Multiple account model
The multiple account model allows a customer to have more than one account registered at the same time. This allows the customer to use different accounts for different situations.
For example, a customer may have two policies - policy1 and policy2. The customer may wish to pay for policy1 with a Visa card then pay for policy2 with an Amex card. Using the multiple account model you can register both cards in QuickVault. Then later, when it is time to make a payment, the appropriate card can be used.
Generating the account token
A token is a unique identifier for a particular account. It is a shared identifier, meaning your system and QuickVault will both agree to use this value when referring to the account. At the time of registration QuickVault will store the token alongside the account details. Then at the time of payment your system will provide this token to your Westpac payment solution so it can lookup the corresponding account details.
This section describes the different options available for generating the account token. These options vary based on the customer account model you chose in the previous section.
If you chose the single account model, see Tokens for the single account model. If you chose the multiple account model, see Tokens for the multiple account model.
Tokens for the single account model
In the single account model there are two ways to generate the account token. You can choose either:
- Client generated token
- QuickVault generated token
Client generated token
A client generated token is a value created by your system. It uniquely identifies a customer's account. For example, the account token may be the customer's reference number or member ID.
At the time of registration your system will provide the token to QuickVault so it can be stored alongside the account details. Then at the time of payment your system will provide the token to your Westpac payment solution so that the corresponding account details can be used.
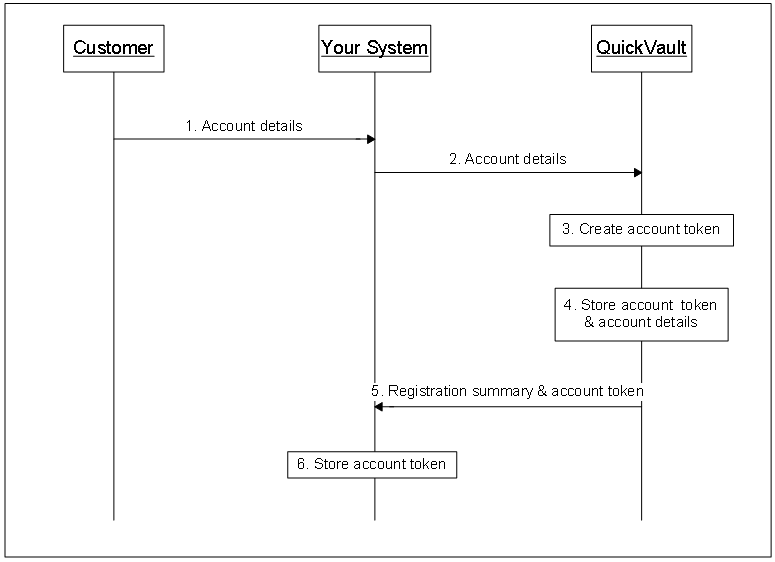
The diagram below shows the high level steps involved when registering an account.
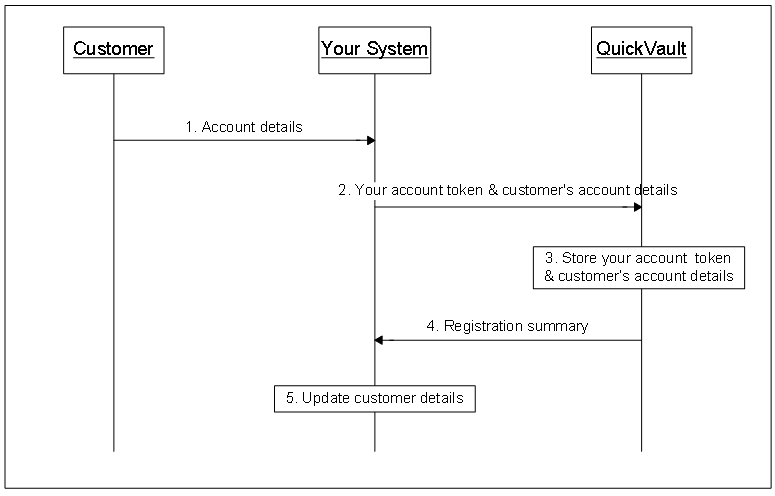
Registering with a client generated token
The steps for registering an account with a client generated token are as follows:
- The customer provides their account details to your system.
- Your system provides the account token and the customer's account details to QuickVault. This is done via the API Request. The account token is a value that uniquely identifies the customer. For example, the customer reference number or member ID. Technical details for this process will be discussed further below.
- QuickVault stores the account token alongside the account details.
- QuickVault sends the registration summary to your system. This is done via the API response. The registration summary includes a response code to indicate whether the account was successfully registered. Technical details for this process will be discussed further below.
- Your system will retrieve the response code from the registration summary. If the response code indicates the account was successfully registered you will:
- Update the customer's details to indicate the account has been registered in QuickVault.
- Store some of the account details if necessary. For example, you should consider storing the card scheme if your system is going to calculate the card surcharge.
Registration is now complete. When it is time to make a payment, your system will provide the account token to your Westpac payment solution.
QuickVault generated token
A QuickVault generated token is a value that is created by QuickVault at the time of registration. It uniquely identifies a particular account. We recommend using this type of token rather than a client generated token if:
- Your system doesn't have a unique ID currently stored against each account, or
- Your system does have a unique ID, but it can only be provided at the time of registration - it cannot be provided at the time of payment. For example, you cannot change the software that is responsible for the payment process.
QuickVault can format the token in a number of ways. During the implementation process you will select your preferred format. This will be discussed in more detail in Formats for the QuickVault generated token.
Once the token is generated QuickVault will store it alongside the account details. A copy of the token will also be given to your system to store. Then at the time of payment your system will provide the token to your Westpac payment solution so that the corresponding account details can be used.
The diagram below shows the process for registering an account using a QuickVault generated token.
Registering with a QuickVault generated token (for the multiple account model)
The steps for registering an account with a QuickVault generated token are as follows:
- The customer provides their account details to your system.
- Your system provides the customer's account details to QuickVault. This is done via the API Request. Technical details for this process will be discussed further below.
- QuickVault creates the account token. There are a number of ways this token can be formatted.
- QuickVault stores the account token alongside the account details.
- QuickVault sends the registration summary to your system. This is done via the API response. The registration summary includes a response code to indicate whether the account was successfully registered and the account token generated by QuickVault. Technical details for this process will be discussed further below.
- Your system will retrieve the response code from the registration summary. If the response code indicates the account was successfully registered you will:
- Store the account token
- Store some of the account details if necessary. For example, the card scheme (if your system is going to calculate the card surcharge).
Registration is now complete. When it is time to make a payment, your system will provide this account token to your Westpac payment solution.
Tokens for the multiple account model
A QuickVault generated token is a value that is created by QuickVault at the time of registration. It uniquely identifies a particular account. We recommend using this type of token rather than a client generated token if:
- Your system doesn't have a unique ID currently stored against each account, or
- Your system does have a unique ID, but it can only be provided at the time of registration - it cannot be provided at the time of payment. For example, you cannot change the software that is responsible for the payment process.
QuickVault can format the token in a number of ways. During the implementation process you will select your preferred format. This will be discussed in more detail in Formats for the QuickVault generated token.
Once the token is generated QuickVault will store it alongside the account details. A copy of the token will also be given to your system to store. Then at the time of payment your system will provide the token to your Westpac payment solution so that the corresponding account details can be used.
The diagram below shows the process for registering an account using a QuickVault generated token.
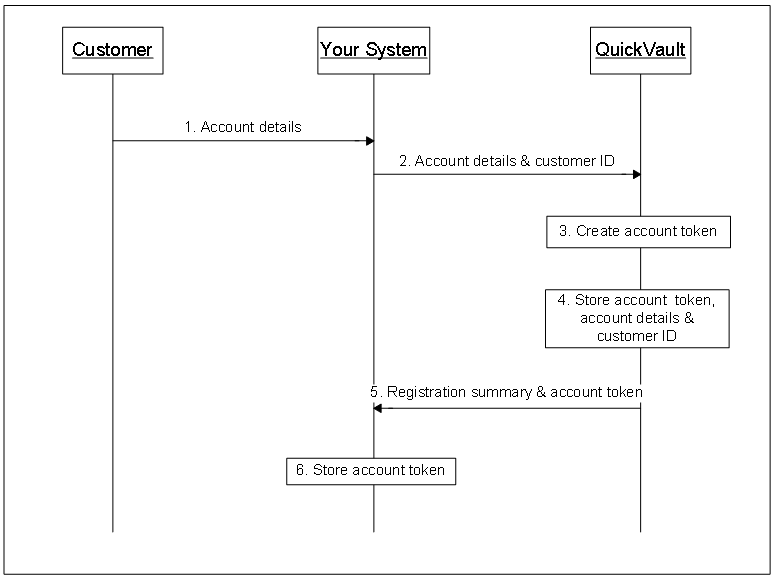
Registering with a QuickVault generated token (for the multiple account model)
The steps for registering an account with this type of token are as follows:
- The customer provides their account details to your system.
- Your system provides the customer's account details and the customer's ID to QuickVault. This is done via the API Request. Technical details for this process will be discussed further below.
- QuickVault creates the account token. There are a number of ways this token can be formatted.
- QuickVault stores the account token alongside the account details and customer ID.
- QuickVault sends the registration summary to your system. This is done via the API response. The registration summary includes a response code to indicate whether the account was successfully registered and the account token generated by QuickVault. Technical details for this process will be discussed further below.
- Your system will retrieve the response code from the registration summary. If the response code indicates the account was successfully registered you will:
- Store the account token
- Store some of the account details if necessary. For example, the card scheme (if your system is going to calculate the card surcharge).
Registration is now complete. When it is time to make a payment there are two options:
- Your system can provide a particular account token to your Westpac payment solution.
- If you are using QuickTerminal to make payments, a staff member can enter a customer ID to search for all the accounts associated with that customer, then select the appropriate account to use.
Connecting to QuickVault
This section describes the different ways your system can connect to QuickVault. There are two approaches for implementing this step. You can either:
- Use one of Westpac's software packages
- Develop your own software to connect to QuickVault
Westpac's software packages
Westpac has a number of software packages to help you connect to QuickVault. Each software package provides an object in a particular programming language which performs all the communication with QuickVault. Additional documentation is also included to help you install the software and use it in your application.
Software packages are available for the following technologies:
- Java
- Microsoft Component Object Model (COM) and Active Server Pages (ASP)
- Microsoft .NET
- PHP
Developing your own software
If your solution does not use one of the technologies listed above, or you don't want to install Westpac's software on your servers, you may choose to develop your own connectivity software. This can be done using either SOAP or HTTPS POSTs. For more information about this option please ask your implementation manager for a copy of the 'Custom Integration' document.
Sending an API request
Once a connection has been established with QuickVault, your system will send an API Request. As part of the request your system will provide a list of parameters to QuickVault. The list will vary based on the task you wish to achieve. The following table shows the tasks that may be performed. The parameters required for each task are described in the sections below.
| Task |
|---|
| Registering a new account |
| Replacing an existing account |
| Updating the expiry date |
| Deregistering an account |
| Querying an account |
Once you have sent the API Request your server will wait for an API Response.
Receiving an API response
After QuickVault processes your API Request it will send an API Response back to your server. The API Response is a synchronous message. The purpose of the response is to:
- let your system know whether the task was successful
- provide additional data back to your server
The following table lists the tasks that may be performed and includes a link to the API Response Parameters that QuickVault will return.
| Task |
|---|
| Registering a new account |
| Replacing an existing account |
| Updating the expiry date |
| Deregistering an account |
| Querying an account |
Registered accounts report
At the end of each day QuickVault can provide you with a Registered Accounts Report. The report lists all the accounts that have been registered throughout the day. It can be provided for any of the registration solutions, however it is mainly used for Web registration, QuickConnect registration and Portal registration.
QuickVault will generate the report at 12am each night. You can then upload the report into your system and reconcile the data against notifications you received earlier in the day.
QuickVault offers a standard file format. See Registered accounts report.
Identifying expiring cards
QuickVault's Expiring Cards Report provides you with a list of cards that are due to expire. QuickVault will generate the report at the start of each month. You can then upload the report into your system and notify your customers about their expiring cards.
QuickVault offers a CSV file format containing the expiring card details and account token. See Expiring cards report.
Testing
See Testing.
Test URLs and IP addresses
See Test URLs and IP addresses.
QuickVault (via HTTPS POST)
If you are using an HTTPS Post to connect to QuickVault, use the following URLs:
https://ccapi.client.support.qvalent.com/post/CreditCardAPIReceiver
https://quickgateway-test.paymentsonline.co.nz/post/CreditCardAPIReceiver (New Zealand)
QuickVault (via SOAP)
If you are using SOAP to connect to QuickVault, use the following URLs:
https://ccapi.client.support.qvalent.com/webservice/CardsAPIDocumentLiteral
https://quickgateway-test.paymentsonline.co.nz/webservice/CardsAPIDocumentLiteral (New Zealand)
Test account numbers
See Test card and bank account numbers.
Sign off
After you have completed your user acceptance testing you must send a 'sign off' email to your Qvalent implementation manager. The email will state that you have successfully tested all aspects of the solution and you are ready for it to be moved into production. A sample email is included below.
To: Qvalent implementation manager
Cc: Westpac implementation manager
Subject: QuickVault batch registration sign off
We have successfully completed user acceptance testing. Our tests covered all areas of the solution.
Our card registration tests covered:
- Registering an account for a particular customer
- Replacing that registered account with a new account
- Attempting to register an account with invalid details
- Attempting to register an account that is already registered
Our bank account tests covered:
- Registering an account for a particular customer
- Replacing that registered account with a new account
- Attempting to register an account with invalid details
- Attempting to register an account that is already registered
Our connectivity tests covered:
- Sending Registration Request Files to QuickVault using iLink
- Retrieving Registration Response Files from iLink or QuickStream portal.
- Uploading the Registration Response File into our system
Our QuickStream admin tests covered:
- Creating users
- Assigning roles to users
- Searching for accounts
We are satisfied with the results of these tests and we are ready for the solution to be moved into production.
Regards,
Allan Smith
Production lodgement
See Production lodgement.
Production URLs and IP addresses
See Production URLs and IP addresses.
QuickVault (via HTTPS POST)
If you are using a HTTPS Post to connect to QuickVault, use the following URLs:
https://ccapi.client.qvalent.com/post/CreditCardAPIReceiver
https://quickgateway.paymentsonline.co.nz/post/CreditCardAPIReceiver (New Zealand)
QuickVault (via SOAP)
If you are using SOAP to connect to QuickVault, use the following URLs:
https://ccapi.client.qvalent.com/webservice/CardsAPIDocumentLiteral
https://quickgateway.paymentsonline.co.nz/webservice/CardsAPIDocumentLiteral (New Zealand)
Go live
Once production lodgement is complete and you are satisfied with the results of your low value tests in production you are ready to go live. The term "go live" represents the date you will make the solution available to your customers.
At this stage of the implementation process there are only a few tasks left to complete. They are:
-
Before the go live date, communicate with your customers to inform them about the new payment process.
-
On the go live date, update the appropriate page (or pages) on your website to make the new solution available to your customers.
After you go live, Qvalent and Westpac will closely monitor the solution. This is known as the "monitoring phase" and lasts for two weeks. During this time, if you have any questions or concerns about the solution you should communicate directly with your Qvalent implementation manager.
Post implementation
Once the two week monitoring phase is over the implementation process is officially complete. Your Qvalent implementation manager will hand the solution over to the Qvalent helpdesk. The helpdesk will be responsible for day to day monitoring of the solution and resolving any issues that occur.
If you have any questions or concerns about the solution at this point contact the helpdesk: QuickStream Technical Support.
Security
QuickVault has attained Level 1 PCI DSS compliance. To ensure QuickVault maintains this high level of security the following must be adhered to.
QuickVault will only accept API requests from certain pre-configured IP addresses.
- QuickVault will only accept API requests that contain a valid username/password. Your implementation manager will provide you with your username/password over the phone.
- When your server exchanges information with QuickVault over HTTPS it must trust the root level certificate. That is, your server must trust the certificate issued by a trusted certificate authority - not the certificate issued to Qvalent. The Qvalent certificate will expire and need replacing each year. However the certificate issued by a trusted certificate authority will have a much longer life (i.e. expire in 2028). If your server trusts the Qvalent certificate directly your QuickVault implementation will cease to operate when a replacement certificate is installed.
- QuickVault will store card numbers and expiry dates in encrypted form in the database.
Transport Layer Security (TLS)
QuickVault requires Secure Token Requests and web browser access made using the encryption standard known as TLSv1.2. QuickVault rejects requests made using TLSv1, or TLSv1.1.
If you receive an error that resembles the error message below, then the underlying TLS connection was not successful. Your systems need adjustments or upgrades to work properly with this service.
TLSv1 is not strong encryption, please use TLSv1.2 instead.
Registering a new account
This section lists the parameters that are required to register a new account. It includes information about:
- API Request
- API Response
- Response Codes
API request parameters
To register a new card, provide the following parameters in your API Request. All parameters are mandatory unless stated otherwise.
| Parameter Name | Description |
|---|---|
order.type |
Set to registerAccount |
customer.username |
Your API username. This value will be provided to you by your implementation manager. |
customer.password |
Your API password. This value will be provided to you by your implementation manager. |
customer.merchant |
Your merchant identifier. This value will be provided to you by your implementation manager. |
customer.customerReferenceNumber |
For the single account model:
|
card.PAN |
The card number |
card.expiryYear |
The year that the card expires. Format: yy. For example: 15 (for the year 2015) |
card.expiryMonth |
The month that the card expires. Format: MM. For example: 11 (for the month of November) |
card.cardHolderName |
The name on the card (optional) |
API response parameters
QuickVault will include the following parameters in the API Response. All parameters are mandatory unless stated otherwise.
| Parameter Name | Description |
|---|---|
response.responseCode |
A response code indicating whether the account was successfully registered. |
response.preregistrationCode |
If your solution uses client generated tokens this parameter will not be included in the response. If your solution uses QuickVault generated tokens this field will be populated with the account token that QuickVault created. |
response.cardSchemeName |
The type of card. One of the following values:
|
response.accountAlias |
The card number that was just registered. For security reasons this number is masked. For example, 456471...004 This is an optional parameter - it is only included if the account was successfully registered. |
Response codes
The following table lists the response codes you may receive when attempting to register a new account. QuickVault will include the response code as part of the API Response.
| Response Codes | Description | Account Updated |
|---|---|---|
00 |
The account was successfully registered in QuickVault | Yes |
QE |
A system error occurred whilst registering the account. The account has not been saved. You may attempt to register the account again later. | No |
QA |
Invalid parameters were provided in your request. See the response text for more information. | No |
14 |
The card number provided does not pass the check digit routine. | No |
QY |
Your QuickVault facility does not accept this card type. | No |
54 |
The expiry date provided is in the past. | No |
Replacing an existing account
This section lists the parameters that are required to replace an existing account. It only applies to accounts that have been registered using a client generated token. It provides information about:
- API Request Parameters
- API Response Parameters
- Response Codes
Note, if your accounts have been registered using a QuickVault generated token you must deregister the old account first then register a new account. See 'Deregistering an account' and 'Registering a new account' for details.
API request parameters
To replace an existing account, provide the following parameters in your API Request. All parameters are mandatory unless stated otherwise.
| Parameter Name | Description |
|---|---|
order.type |
Set to registerAccount |
customer.username |
Your API username. This value will be provided to you by your implementation manager. |
customer.password |
Your API password. This value will be provided to you by your implementation manager. |
customer.merchant |
Your merchant identifier. This value will be provided to you by your implementation manager. |
customer.customerReferenceNumber |
Populate this field with the customerReferenceNumber you provided when you first registered the account. |
card.PAN |
The new card number |
card.expiryYear |
The year that the new card expires. Format: yy. For example: 15 (for the year 2015) |
card.expiryMonth |
The month that the new card expires. Format: MM. For example: 11 (for the month of November) |
card.cardHolderName |
The name on the new card (optional) |
API response parameters
QuickVault will include the following parameters in the API Response. All parameters are mandatory unless stated otherwise.
| Parameter Name | Description |
|---|---|
response.responseCode |
A response code indicating whether the account was successfully updated. |
response.preregistrationCode |
If your solution uses client generated tokens this parameter will not be included in the response. If your solution uses QuickVault generated tokens this field will be populated with the account token that QuickVault created. |
response.cardSchemeName |
The type of card. One of the following values:
|
response.accountAlias |
The card number that was just registered. For security reasons this number is masked. For example, 456471...004 This is an optional parameter - it is only included if the account was successfully registered. |
Response codes
The following table lists the response codes you may receive when attempting to replace an account. QuickVault will include the response code as part of the API Response.
| Response Codes | Description | Account Updated |
|---|---|---|
00 |
The account was successfully registered in QuickVault | Yes |
QE |
A system error occurred whilst replacing the account. The account has not been saved. You may attempt to replace the account again later. | No |
QA |
Invalid parameters were provided in your request. See the response text for more information. | No |
14 |
The card number provided does not pass the check digit routine. | No |
QY |
Your QuickVault facility does not accept this card type. | No |
54 |
The expiry date provided is in the past. | No |
Updating the expiry date
This section lists the parameters that are required to update a card's expiry date. It includes information about:
- API Request Parameters
- API Response Parameters
- Response Codes
API request parameters
To update the expiry date of an existing account, provide the following parameters in your API Request. All parameters are mandatory unless stated otherwise.
| Parameter Name | Description |
|---|---|
order.type |
Set to updateAccount |
customer.username |
Your API username. This value will be provided to you by your implementation manager. |
customer.password |
Your API password. This value will be provided to you by your implementation manager. |
customer.merchant |
Your merchant identifier. This value will be provided to you by your implementation manager. |
customer.customerReferenceNumber |
If your solution is using client generated tokens, populate this field with the customerReferenceNumber you provided when you registered the account. If your solution is using QuickVault generated tokens this field is optional, however we recommend you provide the same customerReferenceNumber that you provided when you first registered the account. |
customer.preregistrationCode |
If your solution is using client generated tokens, do not include this parameter. If your solution is using QuickVault generated tokens, populate this field with the preregistrationCode you received from QuickVault when you registered the account. |
card.expiryYear |
The year that the new card expires. Format: yy. For example: 15 (for the year 2015) |
card.expiryMonth |
The month that the new card expires. Format: MM. For example: 11 (for the month of November) |
API response parameters
QuickVault will include the following parameters in the API Response. All parameters are mandatory unless stated otherwise.
| Parameter Name | Description |
|---|---|
response.responseCode |
A response code indicating whether the account was successfully updated. |
Response codes
The following table lists the response codes you may receive when attempting to update the expiry date. QuickVault will include the response code as part of the API Response.
| Response Codes | Description | Account Updated |
|---|---|---|
00 |
The account details were successfully updated in QuickVault | Yes |
QE |
A system error occurred whilst attempting to update the expiry date. The new details have not been saved. Check to make sure you are using the correct customerReferenceNumber or preregistrationCode. | No |
QA |
Invalid parameters were provided in your request. See the response text for more information. | No |
54 |
The expiry date provided is in the past. | No |
Deregistering an account
This section lists the parameters that are required to deregister an account. It includes information about:
- API Request Parameters
- API Response Parameters
- Response Codes
API request parameters
To deregister an account, provide the following parameters in your API Request. All parameters are mandatory unless stated otherwise.
| Parameter Name | Description |
|---|---|
order.type |
Set to deregisterAccount |
customer.username |
Your API username. This value will be provided to you by your implementation manager. |
customer.password |
Your API password. This value will be provided to you by your implementation manager. |
customer.merchant |
Your merchant identifier. This value will be provided to you by your implementation manager. |
customer.customerReferenceNumber |
If your solution is using client generated tokens, populate this field with the customerReferenceNumber you provided when you registered the account. If your solution is using QuickVault generated tokens this field is optional, however we recommend you provide the same customerReferenceNumber that you provided when you first registered the account. |
customer.preregistrationCode |
If your solution is using client generated tokens, do not include this parameter. If your solution is using QuickVault generated tokens, populate this field with the preregistrationCode you received from QuickVault when you registered the account. |
API response parameters
QuickVault will include the following parameters in the API Response. All parameters are mandatory unless stated otherwise.
| Parameter Name | Description |
|---|---|
response.responseCode |
A response code indicating whether the account was successfully deregistered. |
Response codes
The following table lists the response codes you may receive when attempting to deregister an account. QuickVault will include the response code as part of the API Response.
| Response Codes | Description | Account Deregistered |
|---|---|---|
00 |
The account was successfully deregistered in QuickVault. It can no longer be used in card transactions. | Yes |
QE |
A system error occurred whilst deregistering the account. Check to make sure the account has actually been previously registered in QuickVault. | No |
QA |
Invalid parameters were provided in your request. See the response text for more information. | No |
Querying an account
This section lists the parameters that are required to query the details of a registered account. It includes information about:
- API Request Parameters
- API Response Parameters
- Response Codes
API request parameters
To query an account, provide the following parameters in your API Request. All parameters are mandatory unless stated otherwise.
| Parameter Name | Description |
|---|---|
order.type |
Set to queryAccount |
customer.username |
Your API username. This value will be provided to you by your implementation manager. |
customer.password |
Your API password. This value will be provided to you by your implementation manager. |
customer.merchant |
Your merchant identifier. This value will be provided to you by your implementation manager. |
customer.customerReferenceNumber |
If your solution is using client generated tokens, populate this field with the customerReferenceNumber you provided when you registered the account. If your solution is using QuickVault generated tokens this field is optional, however we recommend you provide the same customerReferenceNumber that you provided when you first registered the account. |
customer.preregistrationCode |
If your solution is using client generated tokens, do not include this parameter. If your solution is using QuickVault generated tokens, populate this field with the preregistrationCode you received from QuickVault when you registered the account. |
API response parameters
QuickVault will include the following parameters in the API Response. All parameters are mandatory unless stated otherwise.
| Parameter Name | Description |
|---|---|
response.responseCode |
A response code indicating whether the query was successful. (2 characters) |
response.customerReferenceNumber |
This parameter will be populated with the customerReferenceNumber that your system provided to QuickVault at the time of registration. Note, if your solution is using QuickVault generated tokens and you did not provide a customerReferenceNumber to QuickVault at the time of registration, this field will instead be populated with the account token that was generated by QuickVault. (at most 40 characters) |
response.preregistrationCode |
If your solution uses client generated tokens, this parameter will not be included. If your solution uses QuickVault generated tokens, this will be populated with the unique account token that QuickVault created at the time of registration. (at most 40 characters) |
response.cardPAN |
The card number associated with the registered account. For security reasons this number is masked. For example, 456471...004 (at most 12 characters) |
response.expiryMonth |
The month that the registered card expires. Format: MM. For example: 11 (for the month of November) |
response.expiryYear |
The year that the registered card expires. Format: yyyy. For example: 2015 (for the year 2015) |
response.cardHolderName |
This is an optional parameter. It is only included if you provided a cardHolderName at the time of registration. (at most 60 characters) |
Response codes
The following table lists the response codes you may receive when attempting to query an account. QuickVault will include the response code as part of the API Response.
| Response Codes | Description |
|---|---|
00 |
The query was successful. |
QE |
A system error occurred whilst attempting to query the account. Check to make sure the customerReferenceNumber or preregistrationCode is correct. |
QA |
Invalid parameters were provided in your request. See the response text for more information. |
Manage your security settings
QuickStream Portal is your administration interface for QuickVault. You can manage the following security settings:
- Whitelist the IP addresses for the API Request
- View your connection details, including your credentials for authentication with QuickVault API.
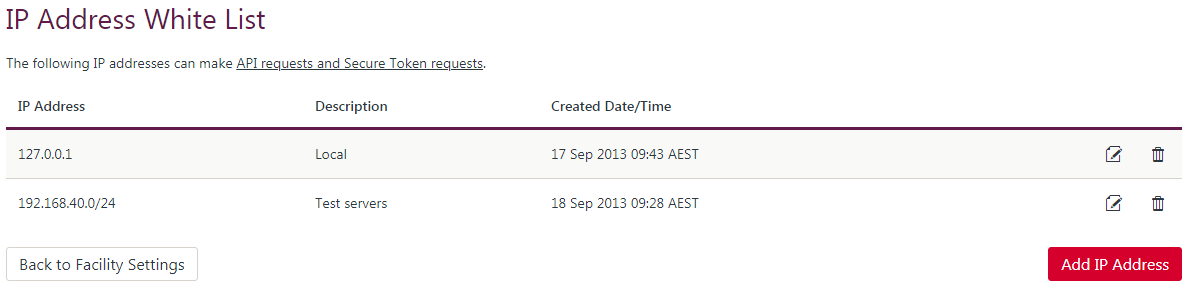
Manage your IP whitelist
The IP address whitelist holds the allowed IP addresses for API Request. Requests made from IP addresses that are not in this whitelist will be rejected, and will not receive a security token.
- Sign into QuickStream Portal
- Click Administration -> Facility Settings -> Manage IP Address Whitelist
- Select Add IP Address to whitelist a new IP address, or select the edit or delete icons to manage existing entries.
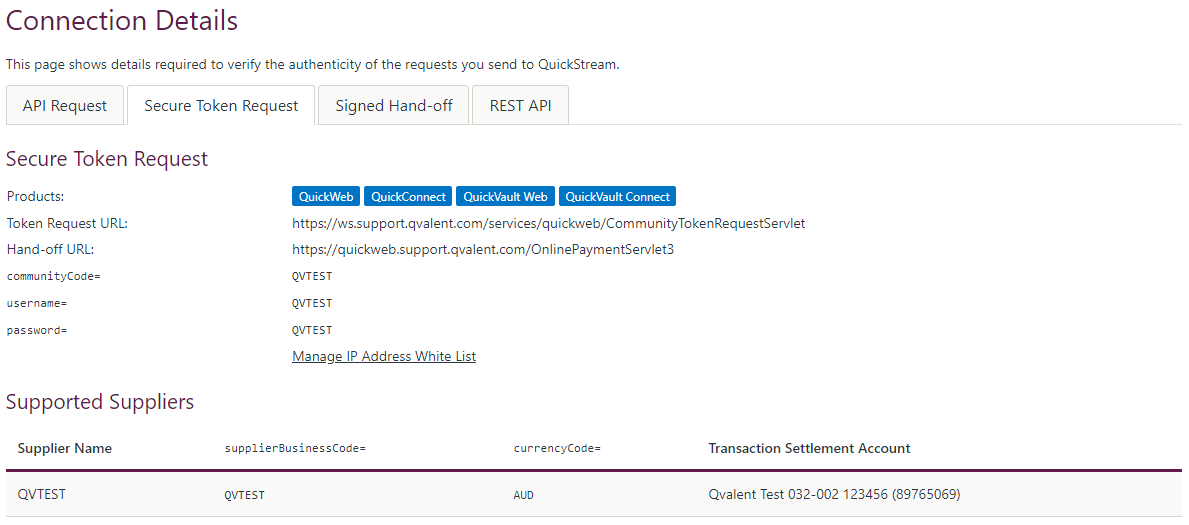
View your connection details
Connection details are required to interact with QuickVault API in each environment. These connection details refer to [values you must pass for the API Request.
- Sign into QuickStream Portal
- Click Administration -> Facility Settings -> View Connection Details
- Select Secure Token Request to view connection details for the Secure Token Request.
Requirements checklist
The purpose of this section is to help identify your requirements. Use the checklist as follows:
- Download the requirements checklist and rename it with your company name.
- Complete as much of the checklist as you can before your first meeting with Westpac.
- Use the checklist to understand the steps required to implement this product.